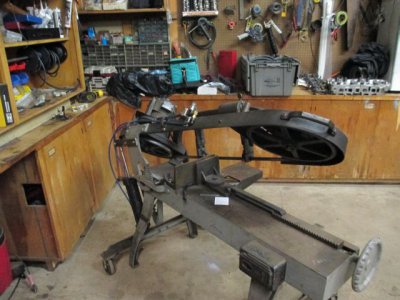
I know there are tons of band saw modifications and post about them on here and everywhere else. After tuning up my old 4 x 6 band saw and getting it to be the metal eating beast it should be, I decided to do some upgrades. I searched the net and found enough upgrade sites and write ups to keep me reading for a month. After hours of looking ( and most of them are listed somewhere on this site also) I picked out the ones I thought were best and started implementing them on my saw. I thought maybe a write up with all the mods done to one saw in one write up would be of interest to anyone who is new to them or is thinking of improving their " saw kit" they purchased. I did a thread on here about setting the tension, choosing the blade, the feed and speed of the blade. that all makes the saw cut. these mods make it a pleasure to use.
My saw is very old, more than twenty five years. The first thing I did was strip the deck by removing the fences height bolt and cleaning the deck. mine was rusty and pitted so I sanded the deck with 60 grit on an orbital sander being sure to keep the pad flat. the next step was to scrape any high areas of the cast iron and then polish the deck with a coarse wet stone. I checked the deck for flatness and it is now better than when it was new.
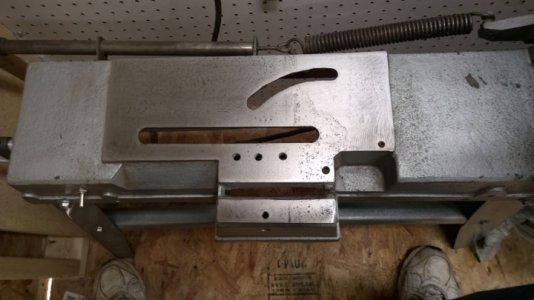 This is the finished deck. Notice I also drilled and tapped three 3/8-16 holes next to the blade area. these are to use my mill clamps for sawing small pieces the vise can't hold. I found this mod on several web sites and it will be a big help to me.
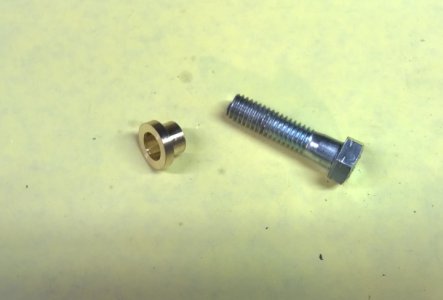 I made a precision brass bushing to fit the 3/8-16 bolt that holds the pivot point of the fence. I drilled the hole in the fence out to 1/2 inch and made the bushing a light press in the fence and the bolt a snug sliding fit in the bushing.
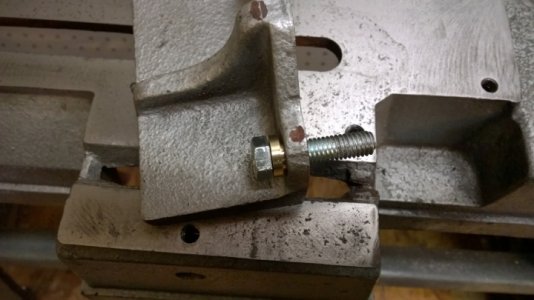
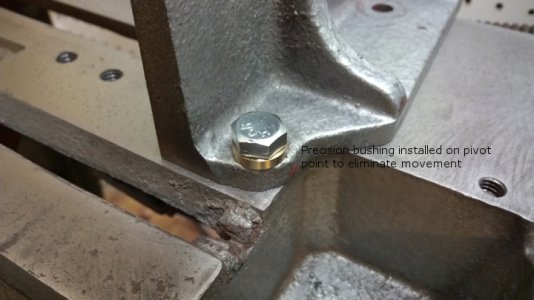 This eliminates any excess movement at this point which is going to help when setting angles and squareness to the blade. there was some play in here from the factory. it wasn't even close to a good fit. now it is tight.
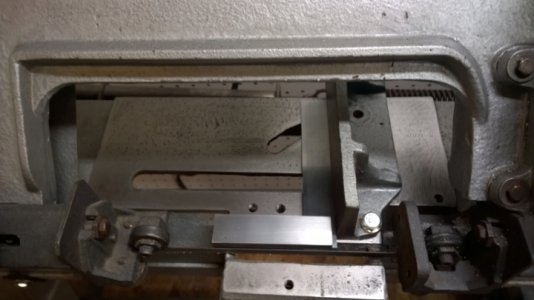 Next , I used a precision square to set the fence square to the blade and locked the fence in this position.
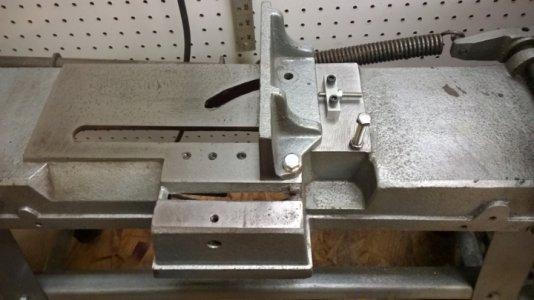 I made a block with along 1/4-20 set screw and bolted it to the table using two 1/4-20 socket head cap screws. This adjustment holds the blade square so when you move the fence to cut an angle, just move it back to the stop and it is square again. Saves a lot of time squaring up the fence. this mod was selected from a web site also. this is also why I put the bushing in the pivot point. slop in the pivot point messes up the squareness when returning the fence to "home". the busing eliminates the problem.
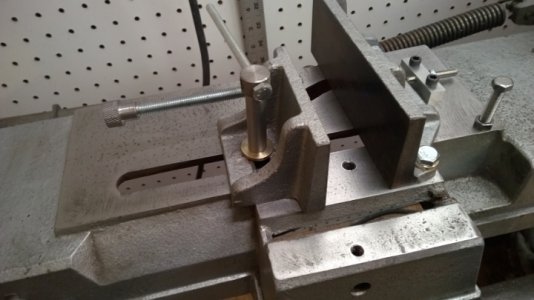 Another modification I saw on a web site I liked was to make a "high" bolt with a Tommy bar and a flanged bushing for the slot in the fence. the 5/16-18 bolt that holds the movable jaw is sloppy fit at best. so , I flied the sides of the slot straight and made a bushing much like for the pivot point. now the movable jaw is a smoother and better fit. it is also easy to tighten and loosen with the Tommy bar. I also drilled and taped the movable jaw for a 3/8-16 threaded rod with a knob on one end. this jack bar holds the vise square when sawing short parts.
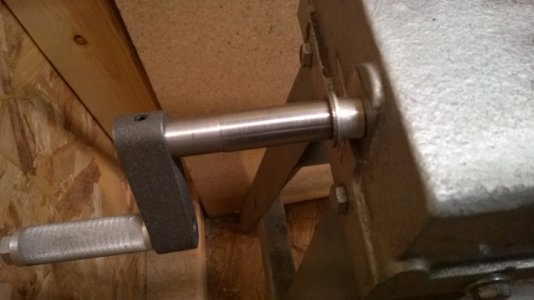 Sometimes I like to rest the saw blade on my work to measure or set up for clamping and then I have a difficult time accessing the crank for the vise. I made an extension for the screw shaft to move the handle out where it is easy to get to when the saw is down. I found the handle did not want to work smoothly. this has always been a problem. the reason was the casting has an angle where the shaft comes out and the casting is not square to the shaft. )I suspect this is a draft angle to let the casting come out of the mold easier
 ).
).
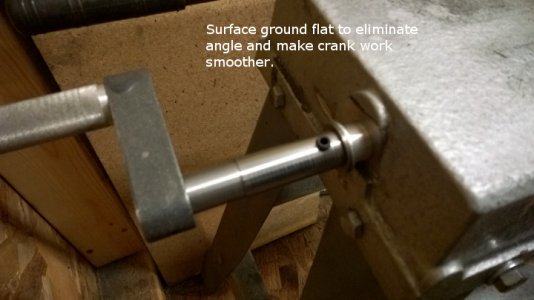 Here you can see where I used my angle grinder to grind the casting flat in this area. the screw works much smoother now.
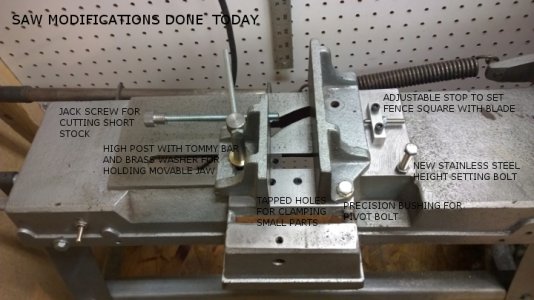 This photo is a review of the modifications don today on my saw. All these mods only took a few hours. I was done in one afternoon.
Next on the schedule is a hydraulic down feed cylinder to replace the garage door spring the manufacturer uses. those parts are ordered and I will add that to this thread when they arrive.
I also have ordered a link v belt for the saw. I tried the belt from my mill on it and "what a difference". The saw runs smoother and quieter, so I ordered a new link belt for it at a cost of $20. the rest of the modifications were free as I used items I had on hand and from my scrap box.
I have plans for a chip pan to catch the chips and a table extension at the out feed area to make "special" sawing setups easier. These will be added as I do them also. So keep watching this space.
With just a little work you can make your cheap ......umm.....inexpensive saw into a really high quality piece of tooling.
Mark Frazier


My saw is very old, more than twenty five years. The first thing I did was strip the deck by removing the fences height bolt and cleaning the deck. mine was rusty and pitted so I sanded the deck with 60 grit on an orbital sander being sure to keep the pad flat. the next step was to scrape any high areas of the cast iron and then polish the deck with a coarse wet stone. I checked the deck for flatness and it is now better than when it was new.
 This is the finished deck. Notice I also drilled and tapped three 3/8-16 holes next to the blade area. these are to use my mill clamps for sawing small pieces the vise can't hold. I found this mod on several web sites and it will be a big help to me.
 I made a precision brass bushing to fit the 3/8-16 bolt that holds the pivot point of the fence. I drilled the hole in the fence out to 1/2 inch and made the bushing a light press in the fence and the bolt a snug sliding fit in the bushing.
 This eliminates any excess movement at this point which is going to help when setting angles and squareness to the blade. there was some play in here from the factory. it wasn't even close to a good fit. now it is tight.
 Next , I used a precision square to set the fence square to the blade and locked the fence in this position.
 I made a block with along 1/4-20 set screw and bolted it to the table using two 1/4-20 socket head cap screws. This adjustment holds the blade square so when you move the fence to cut an angle, just move it back to the stop and it is square again. Saves a lot of time squaring up the fence. this mod was selected from a web site also. this is also why I put the bushing in the pivot point. slop in the pivot point messes up the squareness when returning the fence to "home". the busing eliminates the problem.
 Another modification I saw on a web site I liked was to make a "high" bolt with a Tommy bar and a flanged bushing for the slot in the fence. the 5/16-18 bolt that holds the movable jaw is sloppy fit at best. so , I flied the sides of the slot straight and made a bushing much like for the pivot point. now the movable jaw is a smoother and better fit. it is also easy to tighten and loosen with the Tommy bar. I also drilled and taped the movable jaw for a 3/8-16 threaded rod with a knob on one end. this jack bar holds the vise square when sawing short parts.
 Sometimes I like to rest the saw blade on my work to measure or set up for clamping and then I have a difficult time accessing the crank for the vise. I made an extension for the screw shaft to move the handle out where it is easy to get to when the saw is down. I found the handle did not want to work smoothly. this has always been a problem. the reason was the casting has an angle where the shaft comes out and the casting is not square to the shaft. )I suspect this is a draft angle to let the casting come out of the mold easier
 ).
). Here you can see where I used my angle grinder to grind the casting flat in this area. the screw works much smoother now.
 This photo is a review of the modifications don today on my saw. All these mods only took a few hours. I was done in one afternoon.
Next on the schedule is a hydraulic down feed cylinder to replace the garage door spring the manufacturer uses. those parts are ordered and I will add that to this thread when they arrive.
I also have ordered a link v belt for the saw. I tried the belt from my mill on it and "what a difference". The saw runs smoother and quieter, so I ordered a new link belt for it at a cost of $20. the rest of the modifications were free as I used items I had on hand and from my scrap box.
I have plans for a chip pan to catch the chips and a table extension at the out feed area to make "special" sawing setups easier. These will be added as I do them also. So keep watching this space.
With just a little work you can make your cheap ......umm.....inexpensive saw into a really high quality piece of tooling.
Mark Frazier


