G0602 tailstock driving me nuts

Have you measured the actual thickness of the bed? It can be measured with a micrometer.
I have. I forget the measurement, but it's something approaching 0.100". Good suggestions. Nice drawings.
I can relate to your marital woes. My ex decided to start cheating after 22 years of marriage. It took some time to finally get her out of my life but I have since remarried and prospered now that the mill stone was removed from aroud my neck. Going on 22 years with the second wife now.
My heart is lonely, and I want to find somebody, but that just isn't a problem I have the right skills to solve. I decided to turn my focus toward my shop. I also decided to get off Facebook and hang out in places like this instead.

Vast improvement in enjoyment operating this lathe.
That replacement clamping plate is a very interesting idea. I started thinking about what I have on hand I could use to make one, and hit on this half of a truck leaf spring I picked up one day. This got me started thinking about how the clamp would perform if I left the curvature as it is. I don't know. That's worth some experimentation. You can't beat the price I paid for the steel anyway.
 
I have the Jet version of this lathe and it had the same problem. The casting for the lock was horrendous, and it would always bind. It wasn't flat and it didn't match the underside profile. Still, I found that much of my problem was paint on the sides and underside, but there were some rough spots that I took care of with a file in an improvised jig.
The original lock would bind due to the offset that you describe, and a spring didn't cut it. I machined a much larger, heaver one that kept it guided so it would not rotate and bind, and machined the steps to match the offset. The bottom of the tailstock also was far from flat or matching the vee, but I brought it in by filing and scraping. Now I can adjust it to <90 degree turn of the nut to lock it, and it never slides when locked.
Vast improvement in enjoyment operating this lathe.
View attachment 339290
Your casting looks much worse than mine.. I could see how it would be problematic.
 
I was just using the lathe and remembered that a big contributor to the problem was that the factory clamp didn't use the entire bearing surface on the underside of the bed and most of the rough spots were to the inside. When I made the new clamp it ended up being considerably wider than the factory clamp. I managed to find the old one (I don't throw anything away haha) - the difference is stark!
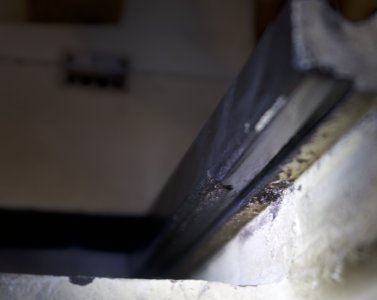
lathe bed1.jpg
This is the roughest spot on the bed.
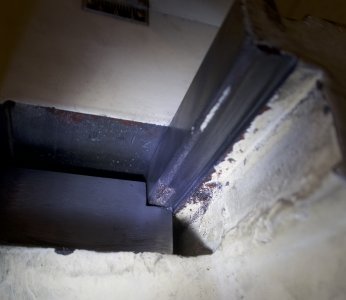
lathe bed2.jpg
This shows how the new clamp bridges the rough spot and bears on the machined surface closer to the rib of the casting.
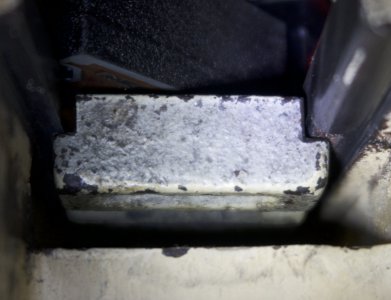
lathe bed orig.jpg
This shows how the original clamp was too narrow and would land right in the rough spot. Worse yet, because it is too narrow it tends to spin and ratchet. There's almost 1/8" all around this thing, it is far too loose.
Take a close look at yours, I wouldn't be surprised if you find it's the same issue.
It took me a long time to properly diagnose this and I tried a few kludge fixes before doing it right. I know I had to square up that shoulder with a file, too, but I don't have any "before" photos. It was worth it, though - now finger tight on that nut is good enough for small drills, even!
You're probably right. Having recently reassembled the clamping setup several times, I'd say the part in question is pretty sloppy. When I head out to the shop later, I'm going to scrutinize all of this more carefully.
 
You're probably right. Having recently reassembled the clamping setup several times, I'd say the part in question is pretty sloppy. When I head out to the shop later, I'm going to scrutinize all of this more carefully.

Good luck, this problem was driving me insane and it took a lot of head scratching to even figure out what the real problems with the mechanism were.

I recommend inspecting the underside of the tailstock, too. Mine wasn't flat and would rock, so it would take a lot of clamping force to make it stay put. I blued it with dykem and found very little bearing against the bed. If you try to correct it, be mindful that you might induce a permanent misalignment in the tailstock ram with respect to the spindle axis, but if it doesn't sit flat it can't possibly be aligned, anyway! My taper adjustment was useless, too, and I took care of that at the same time. Just remember these machines should be viewed as a kit if you want them to run like a proper precision tool haha.
 
You know, as much as it excites me to see this manufacturer short coming and wanting to fix it...I’m finding I’m spending 80% of my shop time making tools or improving machines....both are very valuable, don’t get me wrong. I really want to start spending my time making things that don’t live in the shop. I wasn’t here.... I never saw any of these improvements...
 
I really want to start spending my time making things that don’t live in the shop.
I can relate. I've spent most of my shop time making improvements to my machines too. That's always the thing with stuff like this. If you want something really good, you have to pay through the nose. I kind of have a foot in both camps on that one, as I just went through a round of replacing Chinese stuff with American stuff. Industrial Air compressor, Kurt DX4 vise, Aloris tool post. Getting American machinery is just beyond my reach right now though. Plus I'm pretty deeply invested in these machines at this point. They're mine. I made them so.
 
Back
Top