- Joined
- Feb 1, 2015
- Messages
- 9,602
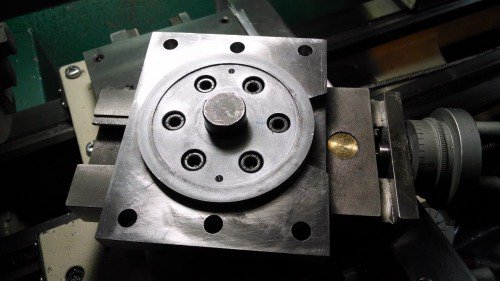
My first upgrade after I got my Grizzly G0602 lathe was to beef up the compound clamping system. I designed a clamp modeled after several designs posted on various forums. In the process, I also decided to beef up the protractor ring mounting. To that end, I added three additional screws for a total of six. I also added two pilot holes for future installation of dowel pins to fix the protractor to the compound base.
Because I would have to align the protractor prior to doweling, I did not complete that part of the upgrade. The problem was how to accurately align the compound for 0 degrees.
My first attempt was to mount a tenths reading test indicator and to sweep the side of the compound rest. I adjusted the compound angle until there was zero runout over a 3-1/2" length. I then turned a piece of 1-1/4" aluminum using the compound. The result was tapered, indicating that the side of the compound rest was not parallel to the ways of the compound (the taper was about .001"/")
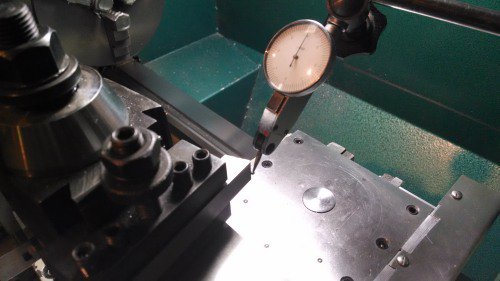
Plan B: I mounted a new 1/2 tool bit on its side in the QCTP toolholder so the edge was vertical and the angle of the vee was split on either side of a perpendicular to the spindle axis. The test indicator was set on the rear lathe way several inch off to the right of the crossfeed. The compound was adjusted so the edge of the tool bit was approximately in a plane running through the compound pivot and perpendicular to the spindle axis. The reason for doing this is when adjustments to the compound angle are done later, they will have a minimum effect on the initial indicator reading.
The carriage and crossfeed are moved to intersect the indicator point. When contact is made, the carriage is swept back and forth to obtain a maximum deflection. The crossfeed is adjusted to give a convenient reference point on the indicator dial.
Now, the compound is retracted a suitable distance (about 3.5" on the G0602). More distance makes a more sensitive measurement but too much will not leave enough mating contact area on the ways. (Loose ways can affect the measurement so they should be adjusted prior to the calibration procedure.)The carriage is then moved to contact the indicator point and swept to find the maximum deflection. If the compound is parallel to the lathe ways, you will get the same reading as in the first step. If not, rotate the compound to get a matching reading. Because the offset of the pivot is so much greater than the offset on the first measurement, the first measurement will not be greatly affected. (I use this technique when aligning my RT as well).
Move the compound back to the first position and recheck the indicator. If there is an offset, readjust the reading and repeat. The second pass should bring you into alignment.
To adjust the protractor dial, I loosened the mounting screw so they were just snug. I mounted the compound and set it so the zero degree mark lined up with the index line and locked the dial in place with the compound clamp. I then went through the above procedure, adjusting the compound angle with light taps with a plastic faced hammer. When I was satisfied with the alignment, I carefully removed the compound and tightened the compound protractor screws. At that point, I could have finished the install of the two dowel pins as well.
Finally, I checked the runout of the side of the compound rest and verified that it is indeed .001"/".
While this is specifically aimed at the G0602 crowd, the procedure will be adaptable to any lathe. With a test indicator with .0001" graduations, it is possible to set the compound angle to +/- 6 seconds of arc.


