- Joined
- Jun 26, 2014
- Messages
- 619
I decided to put together a new thread of my furnace build. I have been posting some summaries of the build on the POTD thread over the past couple of months so some of this may seem familiar/repetitive to those who have followed it there, but I thought it worth putting it all together in one place and to add a bit more detail as it has been by far the topic that has generated the most interest of my posts.
Building a small furnace, primarily with the intention of having a go at casting aluminium, had been on my todo list for a while but never made it to the top. A friend recent decided he wanted to build one too (to have a go at forging knives), so with a companion to help and bounce ideas off I finally got the motivation to build one.
After a bit of research we decided to build them around a 14kg LPG cylinders – these are the same diameter as the more popular 9kg cylinders but taller in height. In the end a second hand 14kg cylinder was only marginally more expensive than a 9kg cylinder and gave the option of a greater internal volume if required. The furnace I build was a vertical one for use with a crucible for melting aluminium, while my friend built a horizontal forge using the same base materials.
The Burner
The build started with turning up the components to build the burners from design plans my friend had found on the Internet through forging and blacksmithing forums.
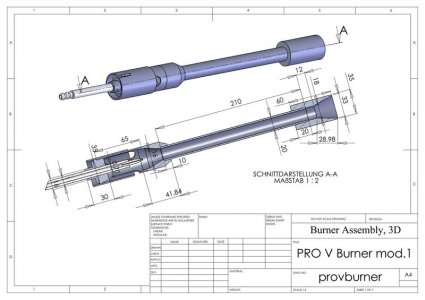
The PRO V Burner is a venturi design (no forced air required) and supposed to be the bees knees according to his research of forums etc on the subject.
Credit for the burner design goes to a Daniel Gentile, and the plans can be downloaded from:
https://dg.box.net/shared/static/s3pjhjalji.pdf or
http://www.iforgeiron.com/topic/168...l=need+better+burner&fromsearch=1#entry170678
For materials I just used what I had at hand or was locally available and we managed to keep to his dimension within a couple of mm, slightly adjusting the diameter of the induction chambers to what tube we had available.
The body was mild steel and the flare I turned from a piece of unknown stainless steel I had lying around. For the tube I had a length of suitable size galvanised pipe on hand but as I didn’t know how hot it would get during operation I decided to de-galvanise it before use. Soaking it for about 24 hours in vinegar, with a couple of wipe downs over that time to remove the oxide did a perfect job of removing all the zinc.
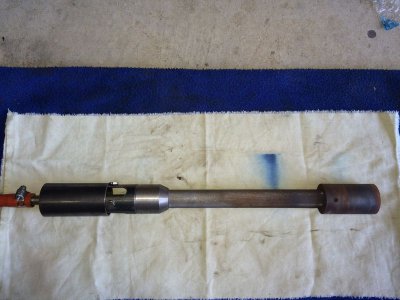
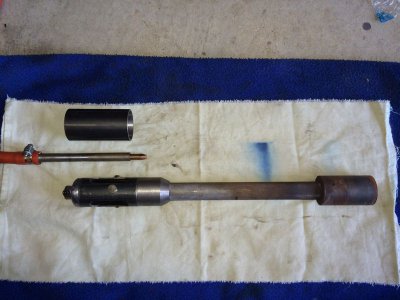
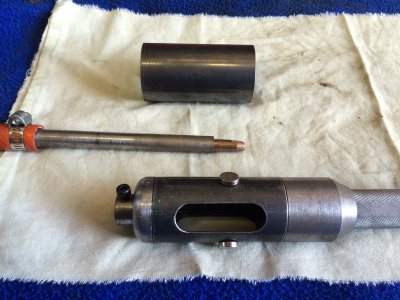
We used a 0.8mm MIG welding nozzle as the 'injector' (not sure what the right word is), but operated well with my regulator wound right down to the low end. We have subsequently got a LPG regulator with a gauge and it operates well between 5 and 25 psi.
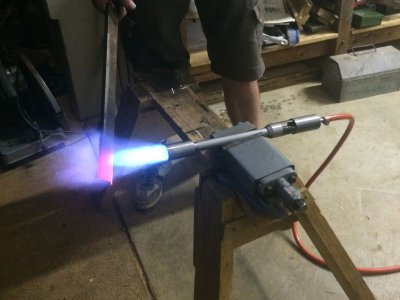
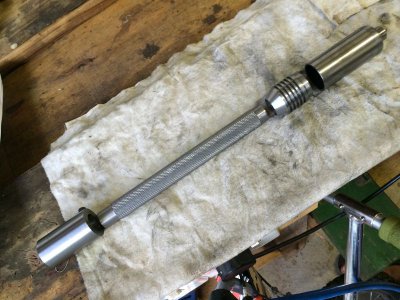
(The Mark 2 version under construction with some totally unnecessary knurling and grooving to add a bit of bling – still needs to have the air inlet slots milled in the body)
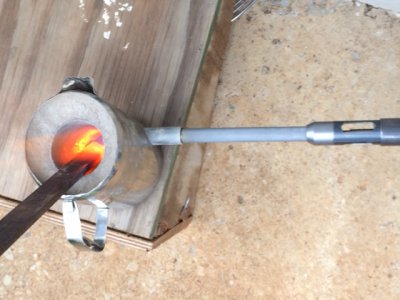
Also gave the burner a test fire in a micro forge I had quickly knocked up with a sand and fire clay refractory while waiting for the refractory products for the final furnace to arrive. This has proven to be quite handy for heating of small parts (for quenching and oil blackening).
The Furnace
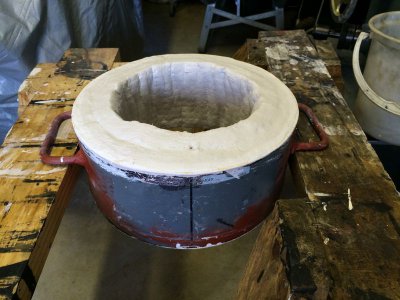
For the body of the furnace I used a 14kg LPG tank and cut into three sections so that the top and bottom sections can be used with or without the middle section as size requirements dictate. Normally I expect to just use the top and bottom section and will make a crucible that suits that size for casting aluminium - which was the primary purpose for building it – but as a wanted to make the furnace as versatile as possible and also use it for simple heat treating/annealing I occasionally may want the extra volume.
I managed to unscrew the valve from the empty LPG bottle by inserting a length of pipe into the bullnose outlet connection to give me sufficient leverage to break the thread seal. I may have just been lucky as I have read these can be very difficult to remove. I then flushed the cylinder 3 or 4 times with water to ensure any residual gas was removed (and finally dropped a lite match in just to be 100% certain) before I started cutting
I bent up some handles from steel rod and welded them to the middle and bottom sections (the top section I kept the original LPG bottle handles), and cut and welded a burner holder tangentially to the proposed inner diameter of the furnace. Handles were actually hot bend using the micro forge above to heat them, and a simple jig in a vice to get them a consistent size.
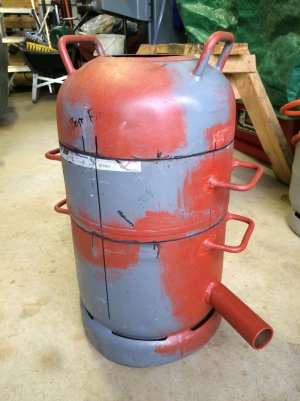
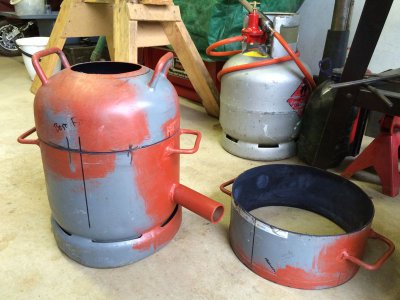
The primary lining is two layers of 25mm thick ceramic fibre blanket (Aluminosilicate fibre) which keeps the weight down to a minimum as the furnace won’t have a permanent operating position in my workshop but will be put away and brought out as needed. We used the densest blanket we could get locally – 128 kg/m³.
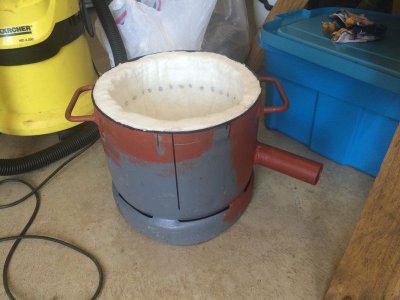
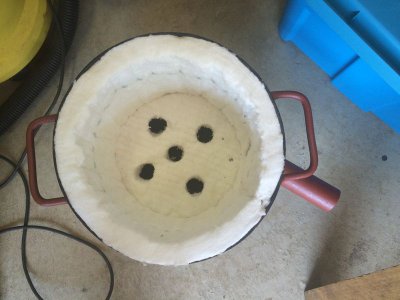
On the bottom I cut five holes through the ceramic blanket to the steel body for ‘legs’ and poured a floor of castable refractory to provide a solid and stable surface for the crucible to sit on.
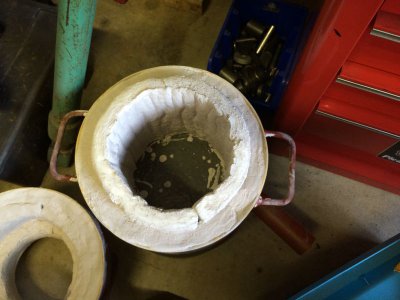
The entire internal surface was then coated with a two part refractory mix (Durrans RMS Module Coat - a water based zircon refractory coating) which is rated for 1700°C. This is a very liquid product and was painted on. It provided a thin, hard shell when fired but has tended to be quite brittle when applied over the flexible ceramic blanket and cracks if knocked. This was especially a problem on the mating surfaces between two furnace sections where I had tried to taper the ceramic blanket edges to make the section fit together and self center. Any high points that took more than their share of weight would crack.
I have applied another couple more coats and it is becoming more hard wearing but I think a few further coats will still be added.
Operation
The first trial use of the forge ‘in anger’ was to try to anneal a 400mm long chunk of rail iron before I begin machining it. Took about 30 minutes to get the whole piece to red hot and I soaked it for a further 30 minutes to get a consistent color end to end. After heating I just sealed up the exhaust at the top of the furnace and left it overnight to cool down slowly.
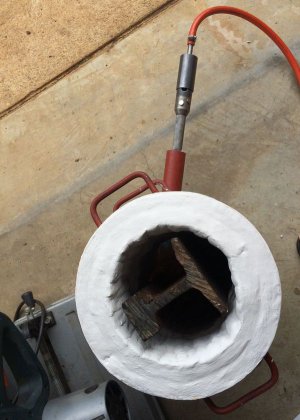
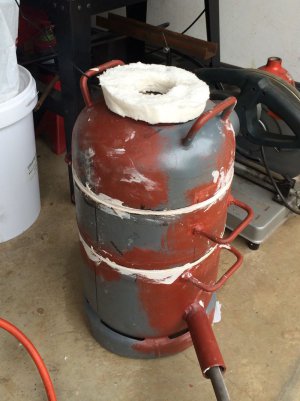
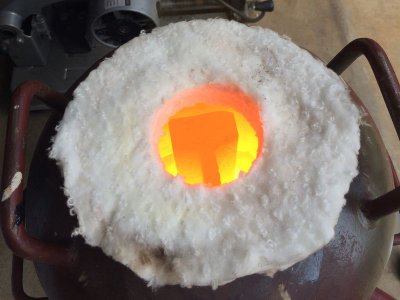
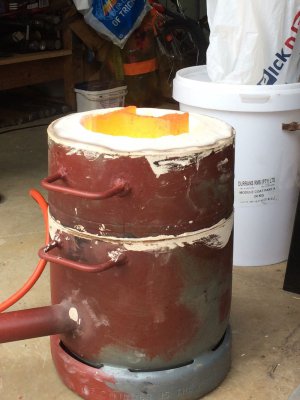
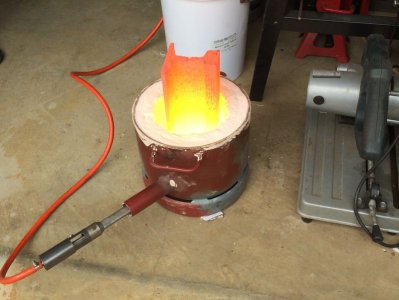
In the photos I'm using an off cut of the ceramic blanket on top to reduce the exhaust hole size to limit heat loss (as the actual hole in the top of the furnace is large as it has been designed as a charge hole for feeding the crucible). I will likely build a more permanent ‘cap’ to do this once I have some more experience of its operation and can optimise the minimum hole size.
Once it had got up to heat I just turned off the gas and put some more ceramic blanket off cuts on top with a brick to hold them down. I had a peak about 30 minutes into the cool down and the iron was still glowing red.
In subsequent uses I have stuck a thermocouple inside the furnace through the top/middle section joint (so should be out of the actual burner flame area) and I was getting a temperature above 1100degC without having done too much in the way of optimisation of the burner and exhaust hole size as yet.
During long operation I have measured the outside of the furnace getting to about 250degC
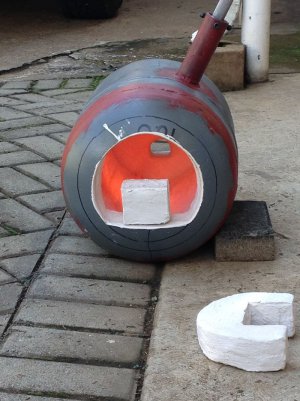
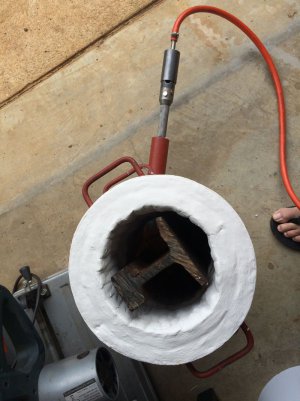
For my friend’s forge we used the same burner and refractory products, but configured the LPG cylinder differently to suit his application. The LPG cylinder was cut in half, and once the ceramic blanket had been installed the two sections were welded back together. The Module Coat was then painted on through the opening.
Building a small furnace, primarily with the intention of having a go at casting aluminium, had been on my todo list for a while but never made it to the top. A friend recent decided he wanted to build one too (to have a go at forging knives), so with a companion to help and bounce ideas off I finally got the motivation to build one.
After a bit of research we decided to build them around a 14kg LPG cylinders – these are the same diameter as the more popular 9kg cylinders but taller in height. In the end a second hand 14kg cylinder was only marginally more expensive than a 9kg cylinder and gave the option of a greater internal volume if required. The furnace I build was a vertical one for use with a crucible for melting aluminium, while my friend built a horizontal forge using the same base materials.
The Burner
The build started with turning up the components to build the burners from design plans my friend had found on the Internet through forging and blacksmithing forums.

The PRO V Burner is a venturi design (no forced air required) and supposed to be the bees knees according to his research of forums etc on the subject.
Credit for the burner design goes to a Daniel Gentile, and the plans can be downloaded from:
https://dg.box.net/shared/static/s3pjhjalji.pdf or
http://www.iforgeiron.com/topic/168...l=need+better+burner&fromsearch=1#entry170678
For materials I just used what I had at hand or was locally available and we managed to keep to his dimension within a couple of mm, slightly adjusting the diameter of the induction chambers to what tube we had available.
The body was mild steel and the flare I turned from a piece of unknown stainless steel I had lying around. For the tube I had a length of suitable size galvanised pipe on hand but as I didn’t know how hot it would get during operation I decided to de-galvanise it before use. Soaking it for about 24 hours in vinegar, with a couple of wipe downs over that time to remove the oxide did a perfect job of removing all the zinc.


We used a 0.8mm MIG welding nozzle as the 'injector' (not sure what the right word is), but operated well with my regulator wound right down to the low end. We have subsequently got a LPG regulator with a gauge and it operates well between 5 and 25 psi.


(The Mark 2 version under construction with some totally unnecessary knurling and grooving to add a bit of bling – still needs to have the air inlet slots milled in the body)
Also gave the burner a test fire in a micro forge I had quickly knocked up with a sand and fire clay refractory while waiting for the refractory products for the final furnace to arrive. This has proven to be quite handy for heating of small parts (for quenching and oil blackening).

The Furnace
For the body of the furnace I used a 14kg LPG tank and cut into three sections so that the top and bottom sections can be used with or without the middle section as size requirements dictate. Normally I expect to just use the top and bottom section and will make a crucible that suits that size for casting aluminium - which was the primary purpose for building it – but as a wanted to make the furnace as versatile as possible and also use it for simple heat treating/annealing I occasionally may want the extra volume.
I managed to unscrew the valve from the empty LPG bottle by inserting a length of pipe into the bullnose outlet connection to give me sufficient leverage to break the thread seal. I may have just been lucky as I have read these can be very difficult to remove. I then flushed the cylinder 3 or 4 times with water to ensure any residual gas was removed (and finally dropped a lite match in just to be 100% certain) before I started cutting
I bent up some handles from steel rod and welded them to the middle and bottom sections (the top section I kept the original LPG bottle handles), and cut and welded a burner holder tangentially to the proposed inner diameter of the furnace. Handles were actually hot bend using the micro forge above to heat them, and a simple jig in a vice to get them a consistent size.


The primary lining is two layers of 25mm thick ceramic fibre blanket (Aluminosilicate fibre) which keeps the weight down to a minimum as the furnace won’t have a permanent operating position in my workshop but will be put away and brought out as needed. We used the densest blanket we could get locally – 128 kg/m³.

On the bottom I cut five holes through the ceramic blanket to the steel body for ‘legs’ and poured a floor of castable refractory to provide a solid and stable surface for the crucible to sit on.

The entire internal surface was then coated with a two part refractory mix (Durrans RMS Module Coat - a water based zircon refractory coating) which is rated for 1700°C. This is a very liquid product and was painted on. It provided a thin, hard shell when fired but has tended to be quite brittle when applied over the flexible ceramic blanket and cracks if knocked. This was especially a problem on the mating surfaces between two furnace sections where I had tried to taper the ceramic blanket edges to make the section fit together and self center. Any high points that took more than their share of weight would crack.
I have applied another couple more coats and it is becoming more hard wearing but I think a few further coats will still be added.


Operation
The first trial use of the forge ‘in anger’ was to try to anneal a 400mm long chunk of rail iron before I begin machining it. Took about 30 minutes to get the whole piece to red hot and I soaked it for a further 30 minutes to get a consistent color end to end. After heating I just sealed up the exhaust at the top of the furnace and left it overnight to cool down slowly.


In the photos I'm using an off cut of the ceramic blanket on top to reduce the exhaust hole size to limit heat loss (as the actual hole in the top of the furnace is large as it has been designed as a charge hole for feeding the crucible). I will likely build a more permanent ‘cap’ to do this once I have some more experience of its operation and can optimise the minimum hole size.
Once it had got up to heat I just turned off the gas and put some more ceramic blanket off cuts on top with a brick to hold them down. I had a peak about 30 minutes into the cool down and the iron was still glowing red.
In subsequent uses I have stuck a thermocouple inside the furnace through the top/middle section joint (so should be out of the actual burner flame area) and I was getting a temperature above 1100degC without having done too much in the way of optimisation of the burner and exhaust hole size as yet.
During long operation I have measured the outside of the furnace getting to about 250degC
For my friend’s forge we used the same burner and refractory products, but configured the LPG cylinder differently to suit his application. The LPG cylinder was cut in half, and once the ceramic blanket had been installed the two sections were welded back together. The Module Coat was then painted on through the opening.


