- Joined
- Sep 22, 2010
- Messages
- 7,223
http://www.conradhoffman.com/knurling.htm
Conrad's Easy Knurling Method
Blank diameter is critical to quality knurling. The wrong blank diameter can cause the knurl(s) to double track, giving a pattern finer than the knurl was designed to produce, one that's generally unsatisfactory. To make your knurling come out properly with no double tracking you need to select the blank diameter of your stock to match the pitch of the knurl. This is very similar to having two gears of the same diametrical pitch that fit together. Every time you add a tooth the diameter increases by a discrete amount. There are no in-between diameters that work correctly. The same is true of knurls and the blank to be knurled, though fortunately knurls do tolerate a certain amount of error before problems occur.
There is a modern standard for knurls that makes the blank diameter easy to determine, but not all knurls are made to that standard. Standardized knurls work correctly on stock diameters in 1/32" increments or some similar number, depending on pitch. The problem is that we often have knurls of unknown origin and specification. I bought my Eagle Rock scissors knurling tool many years ago and had no idea what the pitch of the knurls was. I also collect used and antique knurls. Knurling was a hit or miss proposition; sometimes it came out great and other times it would double or triple track no matter what I did.
Machinery's Handbook has knurling formulas, though somewhat confusing directions on how to apply them. Information is also available on other web sites and from manufacturers, but you still need to start with information about your knurls. The whole thing is a headache without straightforward instructions. Here's a simple method to determine what you've got and how to select the correct blank diameter.
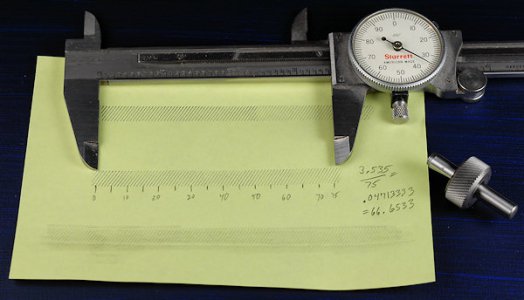
Grab one of your knurls and a pin to fit it. Clean the knurl. Ink the knurl on a stamp pad and roll it down a piece of paper. If you don't have a stamp pad, ink up a piece of paper with that tube of Hi-Spot Blue you forgot you had and use that. Lacking that, just make an impression on the paper by pressing down a little harder. Shade it with a pencil to make it more visible.
Now, count a good number of lines, maybe 50-100. It helps to mark every fifth one with a pencil and count the groups. Measure the distance with verniers. In my case I counted 75 lines and measured 3.535 inches. Divide to get the spacing: 3.535 / 75 = 0.0471" Make this measurement and record the number for each knurl you own.

Attachments
Last edited by a moderator:


