- Joined
- Jul 28, 2017
- Messages
- 2,386
I've wanted to make one of these for a long while, and yesterday I was able to try it out for the first time. It has some warts for sure (I'll point them out) but will be usable for a lot of things. Since it's easy to sharpen and get a good edge I expect it will make it easier for my little mini lathe to cut steel. I know it cuts aluminum like it's warm Velveeta 
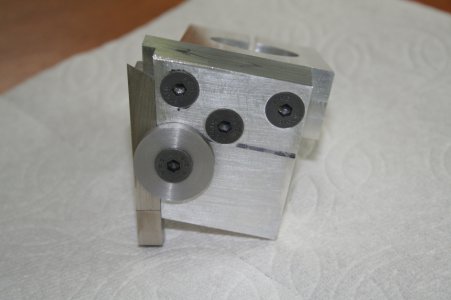
Front (work) view:

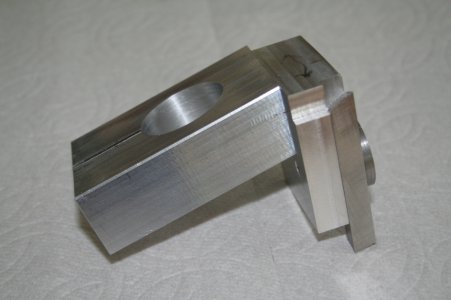
Side view:

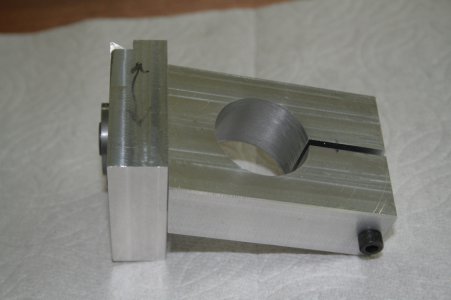
Top view:

The design is based on one I found on another mini-lathe web site I belong to. For that one, the bolted-on piece has both 12-degree angles machined in it, but I saw an opportunity to simplify the setup by separating the angles between the body and tool-mount block.
The eagle-eyed among you will probably notice that the mounting block doesn't have a height-adjusting screw. I designed everything so the tip of the cutter is close to the needed height, and for the fine adjustment I just set the cutter to the right height. This is about as rigid a mount as I could get, particularly when my plinth is installed instead of the compound slide. The angles did mean I got to use a fair amount of (simple) trig to lay everything out so that happened the way I wanted it to.
While it works pretty well, there are some things I would do different next time, if I ever make another one. First, the heads of the mounting screws for the tool mount are higher than the cutter tip. This restricts the DOC I can get when facing to about .010" (the 12-degree angle means the tops of the screw are closer to the work). The tool holder block wasn't wide enough to extend to the front edge of the mounting block, so that complicated the design (different offsets from their respective edges). I used what I had around so I made-do as far as that went. I measured/calculated about five times before I drilled any holes, that's for sure! I also found that doing some to-scale drawings helped to identify some problems. I'm sort of old-school in that regard, using pencil and paper to do it -- but it worked out, for the most part.
When boring the hole in the mounting block, I got its ID so close to the mounting post's OD that I had to ease the clearance a bit with some sandpaper, otherwise it had a tendency to "grab" when I tried installing it onto the post. That means it takes less than a quarter turn of the tightening screw to lock it to the post. I didn't bother countersinking the screw.
All of the screws except the tightener are 6mm flat head screws. I had some 10-32's that were long enough so I used one of them for that.
Front (work) view:

Side view:

Top view:

The design is based on one I found on another mini-lathe web site I belong to. For that one, the bolted-on piece has both 12-degree angles machined in it, but I saw an opportunity to simplify the setup by separating the angles between the body and tool-mount block.
The eagle-eyed among you will probably notice that the mounting block doesn't have a height-adjusting screw. I designed everything so the tip of the cutter is close to the needed height, and for the fine adjustment I just set the cutter to the right height. This is about as rigid a mount as I could get, particularly when my plinth is installed instead of the compound slide. The angles did mean I got to use a fair amount of (simple) trig to lay everything out so that happened the way I wanted it to.
While it works pretty well, there are some things I would do different next time, if I ever make another one. First, the heads of the mounting screws for the tool mount are higher than the cutter tip. This restricts the DOC I can get when facing to about .010" (the 12-degree angle means the tops of the screw are closer to the work). The tool holder block wasn't wide enough to extend to the front edge of the mounting block, so that complicated the design (different offsets from their respective edges). I used what I had around so I made-do as far as that went. I measured/calculated about five times before I drilled any holes, that's for sure! I also found that doing some to-scale drawings helped to identify some problems. I'm sort of old-school in that regard, using pencil and paper to do it -- but it worked out, for the most part.
When boring the hole in the mounting block, I got its ID so close to the mounting post's OD that I had to ease the clearance a bit with some sandpaper, otherwise it had a tendency to "grab" when I tried installing it onto the post. That means it takes less than a quarter turn of the tightening screw to lock it to the post. I didn't bother countersinking the screw.
All of the screws except the tightener are 6mm flat head screws. I had some 10-32's that were long enough so I used one of them for that.

