Dial Hole Check Gage Need Help Travel /divisions

kennyv

Registered
Registered
Joined
Mar 10, 2015
Messages
309
Alright tool junkies can use your help wanted to bounce this off yall . I received this gauge from a friend who wants me to sell it on e bay for him. I dont like misunderstanding and wouldn't want to sell something without properly listing it . ( guess cuz i dont get it yet)

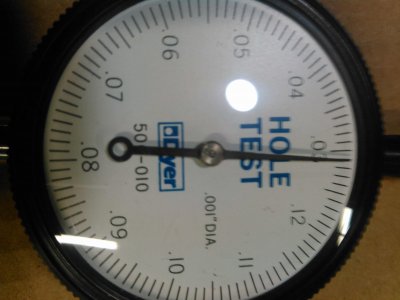
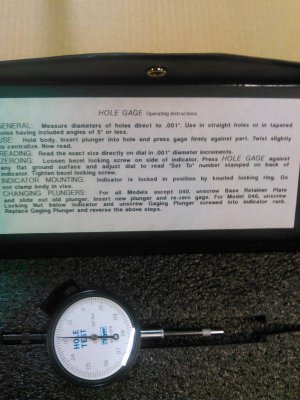
Its a Brencor Inc (Dyer Company) Dial Hole Check Gage Model 500-010. I looked on the website and found no such detailed instructions. As you see it does have instructions however something I dunno why I dont get YET.. Like duh! Help me see this please prob real simple too... Lol
It seems to have One inch travel yet the increments show otherwise (.010) Maybe its just me but how do you measure with this gauge .? Is it meant to use only with a a bore gauge set to proper diam. Reading in positive direction? And how does that correspond with divisions and travel?

The prob i have is a bit of a stumbling block here . Any one like to help me get the picture . Please have a look at divisions in pic they are .010 div yet it seems like it is .100 travel . ??

TIA for any confirmation .

KIMG0287.jpg KIMG0293.jpg
 
Last edited:
Looks like a dial-bore gage without the handle to me . Maybe made for shallow bores ?? I suppose you could set your desired size with jo blocks or ring gage and go off the dial . Nice tool , would work on slots as well .
 
I looks like the diameter of the hole is translated to a distance travelled by virtue of the tapered end of the plunger. When the plunger is seated in a hole and the gage pressed until the stop seats on the surface the diameter can be read out on the gage. Because of the taper, there is a 10 fold increase in sensitivity , like setting a lathe compound to 5.4º and using the compound instead of the crossfeed. A .001" travel on the compound is equivalent to .0001" on the crossfeed.
In using a gage like this, it is important that the edge of the hole be sharp. A chamfer will give a false higher reading for the diameter.
 
It looks to me like the tool is missing a part. There should be some kind of sleeve around the stem of the indicator. Scenario - you hold the end of the sleeve against the surface around the hole to be measured, and the distance the tapered plunger goes into the hole gives you a size reading (as per RJ's post). Note the zero instructions.

The reason I say there should be a sleeve is twofold - (1) It doesn't look like the knurled area of the tip will go inside the indicator's stem (2) note that the "nest" in the case is a lot wider than the stem or the tip. Of course, if the tip does go all the way into the stem, I'm wrong about there being a missing part.

PS - looking at the photo, it appears that the tip on the indicator is not the original one. The correct tip should nearly come to a point, so that it can be used to measure tiny holes (note that the indicator's scale goes down to .03"). And as RJ stated, the tip should have a taper somewhere around 5 degrees included angle. Note that the instructions say the indicator can be used for holes tapered up to 5 degrees. And a 5.74 degree taper gives a 10:1 mechanical advantage (change of diameter vs. depth of penetration). This would work well if the indicator were based on a "standard" movement of 1.000" per turn.
 
Last edited:
lol im laughing not bc of what said but still don't get it..lol the tip is original as I know it was unused it came from a co worker who ordered it .. its brand new never used. and the tip is not tapered nor comes off.lol.. now again lets look at travel and the increments as in how it corresponds ..im sorry visual thinker not to audible .. gota see it in action.
btw I did a search to me it looks like it will mount in any .375 styile collar clamp. an the ones which had any tube sleve were ones which measured in larger travel

Note : It has one full inch of travel yet has .001 divisions yet goes from .030- .120 ?
ok I verified my hunch and put b/t caliper and can concur .001 on gage = .010 in actual so the entire travel would be 1 full inch with 10 divisions on dial as seen . Ok so ya multiply # x 10 still don't get how its set up . My guess its for pre fix checking depth against one another.
anyone want to go there ?
I mean I have used many depth gauges all bore gauges but they were all cut and dry ...
 
Last edited:
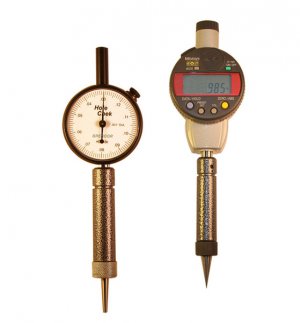
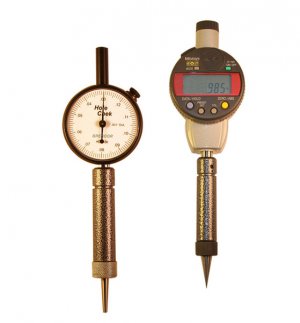
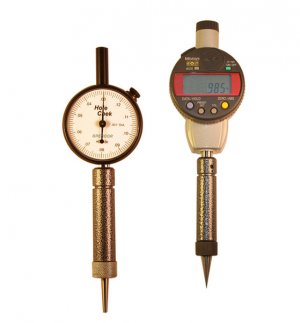
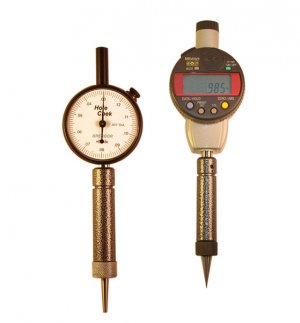
Looks like it is just the indicator part of a hole gage. There should be some sort of body this goes into. The picture below is of a brencor hole-chek. Notice the body below the indicator.
hole-chek-1.jpg

hole-chek-1.jpg

hole-chek-1.jpg

hole-chek-1.jpg

hole-chek-1.jpg

hole-chek-1.jpg
 
Sorry, to me it looks like an incomplete hole gage. As it is, all you have is a dial indictor. The head or stylus is missing. Without the head attachment, it’s just a plain old dial indicator, that’s all, sorry.
 
Last edited:
yea I see now I did some searching looks to be missing a sleeve .. I may try to purchase the sleeve but not sure if it will be worth the investment for the sale. I don't like selling things incomplete either ..Nice Gauge tho .
now I just acquired the spec sheet from Dyer ..nice gauge its is accurate w/ in .0005
anyone interested let me know before I ebay it. thanks again for all your comments
 
lol im laughing not bc of what said but still don't get it..lol
OK, let me try to explain it ...
Zero.JPG

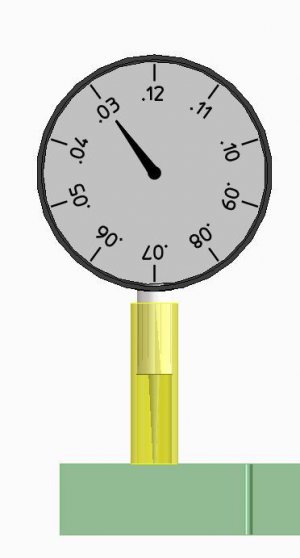
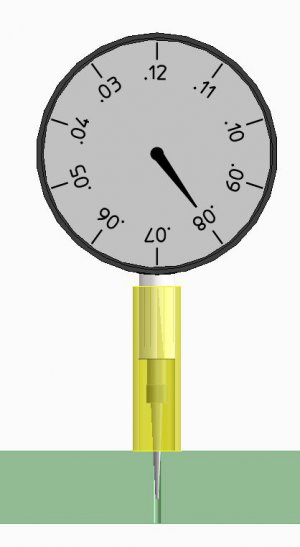
Look at my first picture. Assume the tip is tapered at the magic 5.74 degrees, and that the small end is .030" in diameter. AND that the indicator has a sleeve, as shown in Billh50's post, and shown in yellow in the picture. If you read the instruction sheet for "ZEROING," it says to hold the indicator against a good surface (shown in light green) and set the bezel to the "set to" number. If, indeed, the tip's end is .030" diameter, that's where you'd set the bezel.

InHole.JPG

Now look at the second picture. The indicator is being used to measure a hole that's .080" diameter. When you let the tip enter the hole, it will go inward a distance 0.500", because that's where its diameter is .080". The indicator movement is based on a 1" per turn mechanism, so to indicate 0.500" of tip motion, the needle will go around ½ turn - or to .080 on the scale. As the instructions say, you read the hole diameter (within the limits of .030 to .130) directly.

the tip is original as I know it was unused it came from a co worker who ordered it .. its brand new never used. and the tip is not tapered nor comes off.lol..
I don't know how to answer this point. Everything seems to point to the indicator being as Billh50 pictured, and as I have described ... including the fact that the "nest" in the box is a lot wider than the stem of the indicator. One possibility is that your supplier shipped an incomplete unit (?)

now again lets look at travel and the increments as in how it corresponds ..im sorry visual thinker not to audible .. gota see it in action.
I hope my pictures help.
 
I believe the tube will have the tapered tip for the size hole it is intended measure and the dial tip rides on it. One indicator works with the all tubes.
 
Back
Top