Deep hole drilling “large” stock on mini lathe?

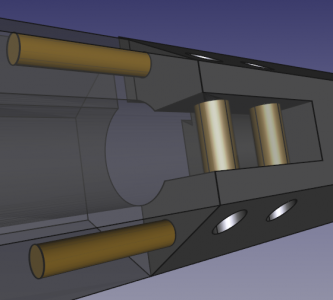
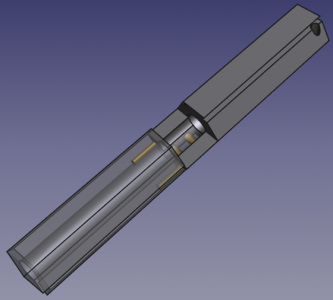
Think of doing it in 2 pieces? If drilling it the full length won't work out. 3D view very quickly done to show concept only. Not to scale or to be taken literally. I think splitting at the breach face might be a viable option. Pin and/or pin and screw might work out. Like I said, it's an idea.

I would also second Andre, you did nice work with your drawings.

Mark

2Piece_1.png 2Piece_2.png
 
Todd,
Is your lathe big enough that "if" the hex is chucked up, you can still get the carriage far enough to the right to get a boring bar in the end of your work?

Cheers Phil

Thanks, Phil. That's sorta how I was originally planning on doing it but with a 3/8" drill bit (pilot hole) mounted in a square boring bar holder shimmed to correct height. After center-drilling first, start with a jobber length bit, then switch to an 8" or 10" long bit to finish. Don't know if that's the correct way of going about it, but that was my plan!...lol

With 6.5" of stock mounted (up against chuck face) and carriage all the way to the right there is only 4.75" between end of hex and carriage. Not a real big deal though as like I said, I could bore in as far as possible, then re-set the boring bar/drill bit out a bit further to finish the job.

Only part that puzzles me is how do I support the end of hex in my steady rest? Was thinking I could possibly sacrifice a 1", 6-point socket (providing it's a snug fit) and slide it on to hex bar then mount everything in steady rest....think that would work?

Ya, I know I need/want a bigger lathe, but unfortunately that will be a year or two down the road yet.
 
You do some good sketchup work! If you ever build full out plans with dimensions, (which I think is a great idea!) please let me know!

Which piece of the bolt cocks the hammer? Is it that pin sticking down from the bolt? Kinda backwards, but a great idea. I like it!

Thanks, Andre! I do have a complete set of drawings w/dimensions and notes but I won't post them until I build one and test it first. All the numbers add up so it *should* work fine, but we all know how the gremlin's like to mess with you between drawing and actual finished product!

Yep, pin sticking down from bolt is what cocks the hammer. I know it looks backwards due to the angle of the link between handle and bolt, but it's actually a "retractable" bolt design. As you close the handle it first seats the pellet .010" past the transfer port, then it cams-over-centerline and "pulls" the bolt probe back so that when handle is in closed position the bolt probe sits flush with backside of transfer port allowing for full on, uninterrupted air flow....great way to make big power!

I'm not the first (or even the second or third!) one to use a retractable bolt, this is just my version. Though AFAIK, no one has done it using hex for the breech...
 
Think of doing it in 2 pieces? If drilling it the full length won't work out. 3D view very quickly done to show concept only. Not to scale or to be taken literally. I think splitting at the breach face might be a viable option. Pin and/or pin and screw might work out. Like I said, it's an idea.
Mark

Thanks for the idea, Mark...never thought of doing it that way! If all else fails I may try that, but would rather have it all in one piece to stay as rigid as possible.
 
If you have a mill with enough travel, you could always give a try at making your own gun drill. Leave out the hole for the fluid, and just work on getting the tip correct. then fab up a couple of guides that are bored on the lathe to ensure alignment. One guide up close to the face, the other out at the end of the bed and feed it by hand. At that length the guides might work out OK using a twist drill as well.

Mark
 
Only part that puzzles me is how do I support the end of hex in my steady rest? Was thinking I could possibly sacrifice a 1", 6-point socket (providing it's a snug fit) and slide it on to hex bar then mount everything in steady rest....think that would work?

Another newbie here, so take this with a grain of salt. Is it feasible to cut your hex stock a little longer than the finished product, indicate the outboard end to align with the chucked end, then center drill it, then mount with a tailstock center and round off a section of the hex at the outboard end to ride in a steady rest while you drill or bore the hole? Then cut off the rounded portion when you're done?

Was also wondering, do you have an independent 3-jaw or a set-true chuck to keep things concentric without having to machine the hex surface? Or is concentricity not a concern?

Tom
 
Last edited:
Thanks, Andre! I do have a complete set of drawings w/dimensions and notes but I won't post them until I build one and test it first. All the numbers add up so it *should* work fine, but we all know how the gremlin's like to mess with you between drawing and actual finished product!

Yep, pin sticking down from bolt is what cocks the hammer. I know it looks backwards due to the angle of the link between handle and bolt, but it's actually a "retractable" bolt design. As you close the handle it first seats the pellet .010" past the transfer port, then it cams-over-centerline and "pulls" the bolt probe back so that when handle is in closed position the bolt probe sits flush with backside of transfer port allowing for full on, uninterrupted air flow....great way to make big power!

I'm not the first (or even the second or third!) one to use a retractable bolt, this is just my version. Though AFAIK, no one has done it using hex for the breech...


Great design, I would love to build one. I detuned my Disco using a 13xx hammer spring, it reduced about 100 FPS and gained 2x amount of shots. I was making a lighter hammer but never finished it...

If the breach helps raise power I can detune it even more and shoot right where I want it (800 FPS or abouts) and get even more shots, while gaining potential accuracy by pushing the pellet in front of the transfer port.

Also make sure the breach screw is behind the loading port, it used to be in front but got moved back about a year ago.
 
Breech,Andre.

I bored out a cannon that was too long for my 40" between centers lathe by feeding an extended length 1 3/8"(approx) drill out of the chuck. I made a special steel cup to hold the future cascabel knob(which at the time was just turned to a cylinder shape).

The drill was about 2' long. The muzzle of the cannon,which was still just a 5" straight cylinder,was rested on a special large oak block I cut to fit the ways and support the 5" cylinder. It was a bit of a pain to thus bore the cannon,as I had to loosen the chuck about every 1/8" and pull it back to clear the chips. The material was a tough aluminum bronze alloy,which was not easy to cut in the first place. Boring the cannon took a few days,but I got the job done just fine.
 
Back
Top