Cutting dovetails-Machinery's Handbook and video

Janderso

Jeff Anderson
H-M Platinum Supporter
Joined
Mar 26, 2018
Messages
8,666
Hi,
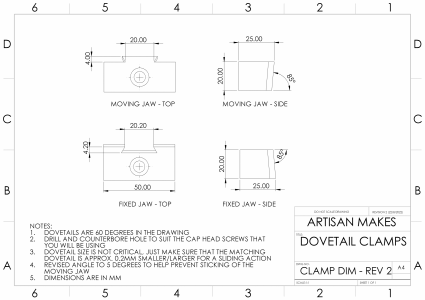
I watched this video and decided it would be a fun project. (Low profile side clamps for the mill table)
I'm going to use A2 then harden the pieces and grind them to a nice finish. I'm going to use 5/16'" hold down bolts so I'll make some custom T-nuts as well. I plan on making two sets.
I bought a new dovetail cutter that takes three carbide inserts. The HSS version seemed like they would have a short life. imho anyway.
The angle of the sliding components was changed to 5 degrees by the author-Artisan Makes.
I sure wish he'd get a band saw.

Before I get started, I decided to bone up on dovetails via the machinery's handbook. The 19th addition does not have it listed in the index. I went to the 12th edition and found it.
I guess dovetails have been eliminated from machinery sometime between 1944 and 1971 :)

1663860339655.png
 
Last edited:
Interesting in that when I went to cut my first dove tails, I looked in the Machinery's handbook and I did not find anything either. I too have the 19th edition :)
 
Hi,
I watched this video and decided it would be a fun project. (Low profile side clamps for the mill table)
I'm going to use A2 then harden the pieces and grind them to a nice finish. I'm going to use 5/16'" hold down bolts so I'll make some custom T-nuts as well. I plan on making two sets.
I bought a new dovetail cutter that takes three carbide inserts. The HSS version seemed like they would have a short life. imho anyway.
The angle of the sliding components was changed to 5 degrees by the author-Artisan Makes.
I sure wish he'd get a band saw.

Before I get started, I decided to bone up on dovetails via the machinery's handbook. The 19th addition does not have it listed in the index. I went to the 12th edition and found it.
I guess dovetails have been eliminated from machinery sometime between 1944 and 1971 :)


View attachment 421003
To make this work, do you need two tee-nuts for each clamp? One for each jaw?
 
that's a really neat little project! What a clever idea.

I've cut alot of dovetails making QCTP holders for a couple of different toolposts. The most straightforward and repeatable way I've found for doing it is to rough out the slot first to full width and a hair off full depth. Then cut the dovetail to the full depth with the dovetail cutter and cut to correct width using two pins slightly smaller in diameter than the full depth of the dovetail to measure (measure between the pins). You can in theory work out that measurement with math, but I snuck up on it using the toolpost as a gauge. Male dovetails would presumably work the same way, though I'd cut one first and then use that to figure out the width of the female dovetail.
I cut mine similarly, but I zeroed the DRO on the center of the dovetail so I could work both sides to the same number and measured over pins to the theoretical size. After I discovered that my adjustable parallel wasn't parallel, I just used my calipers to measure between the pins. They fit perfectly.
 
Cool design! Your timing is great because I need something like that for a toolcutter-making idea I'm working on Thanks for posting!

Harold Hall has some one-piece low-profile clamp designs but I think this one is better, at least for a lot of mill work. His designs do win out if you need to clamp something on its front and back edges so there's a place for both.
 
Still don't understand if you need two tee-nuts for the original design by OP. Do you need two screws and two tee-nuts for this?
Could someone explain it? Having a dense day...
 
You could use one with two tapped holes as long as there's enough clearance for the moveable jaw bolt to allow the moveable jaw to, you know, move :) Otherwise you'd need two.
 
I'm thinking this could be modified with a single screw and tee nut with a large "washer" that pushes down the movable jaw as the screw is tightened. Just thinking out loud.
 
I'm thinking this could be modified with a single screw and tee nut with a large "washer" that pushes down the movable jaw as the screw is tightened. Just thinking out loud.
That would be nice. Extra points if something, like a spring pushed up the movable piece when loosened. Got me thinking about that...
 
Back
Top