Craftsman 6" 101.07301 tear down and rebuild thread (and some questions)

mattthemuppet2

H-M Supporter - Gold Member
H-M Supporter Gold Member
Joined
Sep 28, 2013
Messages
4,395
I'm now the new happy owner of a slightly grungy Craftsman 101.07301 (sleeve bearing) lathe. See here for the story: http://www.hobby-machinist.com/show...-HOME-Sears-101-07301-6x18-Lathe-Sandy-Oregon

Mechanically it appears to be in excellent shape so the main task is to strip it down, clean it and adjust it so that it's running well. While I'm in there I might as well repaint it as the paint is only partly present.

I don't have any pictures yet, but the 3 jaw chuck is off, the drill chuck is out and last night I successfully removed the spindle. Only very light (to the touch) scoring on the spindle and nothing major in the bearings other than a couple of dings where a previous owner was unaware of the woodruff keys in the spindle. Pulley bearings are in great shape and the thrust bearing seems ok. Started cleaning the grunge off the bull gear last night, but it's hard going.

Question - what chemicals are safe to work with on zamac and bronze? Steel stuff I throw into some NaOH and the gunk just falls off, but I wasn't sure about the pulleys. I have some purple power, which helps, but there's a lot of scrubbing and scraping needed. Is WD40 worth trying?

Things on the list this week:

finish cleaning the spindle and parts so I can put them to one side
take apart the motor and see if I can find the reason why it needs a spin to start
inventory the gears on the gear train to see what's there (and what feeds/ threads I can cut)

Longer list:
Take apart and clean the 3 jaw
Take apart and clean the drill chuck (a Jacobs 33 1/2 cap!)

This will most likely take me a lot of time as I don't have much spare time with preparing for classes, but it will be nice to chip away at it whenever I can.

Any recommendations for paint? I was thinking of a silver or grey Rustoleum hammered finish, I think you can get primer+paint in one can. Something simple but ideally effective and inexpensive :) I'm not much of a "how a tool looks" kinda person, but it's a good way to stop it rusting!
 
Matt,

The motor starting problem will usually be one of three things:

Not correctly wired.
Starting capacitor either open or shorted.
Centrifugal switch contacts not closing (stuck open) or contacts burned.

Craftsman is known to have originally used blue-gray, and some shades of blue and green. But overall, the most common colors are dark machinery gray and machinery gray (which are my two preferences). Hammertone finishes in general actually make me a little nauseous. However, you're the one who will be using it. Except that silver probably won't hold up well appearance-wise unless you spend a lot of time cleaning it. I hate painting so I've always just used Rustoleum primer and enamel finish coat except on some radios where I have enamel custom mixed.

For cleaning, I use varsol in an automotive type parts cleaner (with pump) for small parts, a hold over from my Land Rover restoration days. And electrolysis for steel or cast iron larger parts that I'm stripping to paint. The residue is easier to get rid of than any of the chemicals. All of the visible Zamak parts are chrome plated on my machine so they either just get wiped off or go into the parts cleaner. There aren't any visible brass parts but if there were, I'd use Brasso.

Robert D.
 
thanks Robert. I've been doing a bunch of reading on wiring split phase motors so I think I have an idea of how they work :) Enough at least to understand the drum switch. Even if it's wired right I would still like to replace the cords as they're old and dubious in places. When I get it apart I'll have a look at the centrifugal switch too (I don't believe it has a capacitor, there's no place I can see for it).

I've no strong preference for any particular colour or finish, I'd just heard that a hammered finish does a better job of covering up imperfections in the castings. Shame I had to give away the primer and paint I used on my bike frame as those worked really well and seem to be holding up to the abuse it gets too. I'll have to see what's available at HD or the local auto stores.

I think I'm going to give electrolysis a go for the larger stuff as I have a power supply that should work and some rebar scraps, just have to find the time to put it all together. Any steel or iron is ok, but no brass/bronze/zamac, right? That would rule out the headstock I guess as I don't want to remove the bronze bearings.

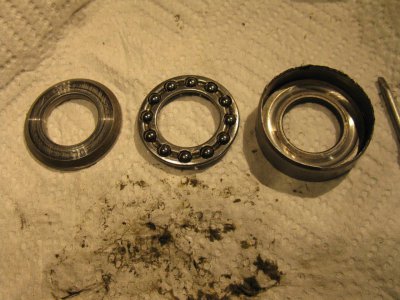
Got some of the spindle parts cleaned up last night and took apart/ regreased the thrust bearing which felt a bit dry and notchy. Pushed apart the drill chuck and leaving that in purple power to soak. Hopefully will clean and put that back together tonight. Just need to clean the spindle pulley and polish the spindle and that bit will be done. Probably do the back gear next.

Another question - if I take the headstock off to clean and paint the bed, how hard will it be to get it back into truth with respect to the bed?
 
I'm now the new happy owner of a slightly grungy Craftsman 101.07301 (sleeve bearing) lathe. See here for the story: http://www.hobby-machinist.com/show...-HOME-Sears-101-07301-6x18-Lathe-Sandy-Oregon


Question - what chemicals are safe to work with on zamac and bronze? Steel stuff I throw into some NaOH and the gunk just falls off, but I wasn't sure about the pulleys. I have some purple power, which helps, but there's a lot of scrubbing and scraping needed. Is WD40 worth trying?

Matt, I'd keep away from the sodium hydroxide on the pulleys or other zamak parts. My recollection is that lye and aluminum or aluminum alloys don't play nicely together.

-frank

Zamak is zinc (mostly). Don't use anything corrosive on it.
 
I have a few 50+ year old Craftsman motors that have the capacitor in the mounting base. I love these old Craftsman 1/2 horse motors. I have one that has been in use for 60+ years, I am the third generation owner and user. The only thing it has needed is oil.
HWF
 
Thanks John and Frank, I was wondering about that. The bull gear came out fine (that I can tell anyway), but there's no point risking it. I'll stick with mineral spirits/ paint thinners/ WD40 for now on. The only downside to starting the strip down is that it's much more fun than finishing the sharpening of my drill bits :)

Thanks Harold, I'll find out when I dig in there. I have the same problem on my current lathe motor (without capacitor) so it would be neat to figure out what's going on and fix that one too!
 
Matt,

Replacing the cordage is a good idea. If the motor isn't a capacitor start, then it's probably split phase or induction start-induction run or repulsion start-induction run. Which is wired the same way as a capacitor start. The only practical difference is that is won't have as much starting torque. But that isn't an issue with a lathe. The switch is the same.

The headstock should be a slight interference fit to the bed. However, you can't be certain of that until it's too late. What I would do before removing the headstock is to take something like a piece of 1" aluminum solid round about a foot long and take a very light cleanup cut on it. Rotate the chuck until #1 jaw is at 12:00. Mark the bar at the tip of the jaw.. Mount a dial indicator on the carriage and zero it at the headstock. Mark the measurement location. Crank the carriage down near the end of the bar and record the dial indicator reading. Mark the measurement location. Then remove the headstock and do whatever you need to do to it. When you reinstall it, put the bar back in the 3-jaw in the same position and orientation as before, and turn the chuck #1 jaw to 12:00. Zero at the headstock and you should get the same reading at the other end..

thanks Robert. I've been doing a bunch of reading on wiring split phase motors so I think I have an idea of how they work :) Enough at least to understand the drum switch. Even if it's wired right I would still like to replace the cords as they're old and dubious in places. When I get it apart I'll have a look at the centrifugal switch too (I don't believe it has a capacitor, there's no place I can see for it).

Another question - if I take the headstock off to clean and paint the bed, how hard will it be to get it back into truth with respect to the bed?
 
Thanks Robert, I'm keen to dive in to the motor but I don't want to get ahead of myself! I should have asked about the headstock beforehand as I've already torn down the headstock, although to be truthful I would have had to do that anyway as it didn't have a belt on it (they're on their way). Would it work to use a ground rod and a DTI on the carriage to align the headstock after assembly?

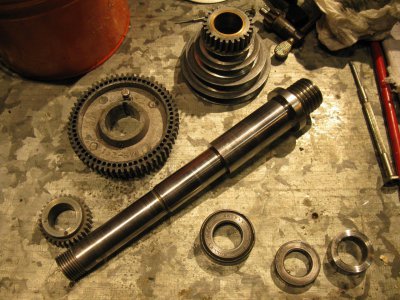
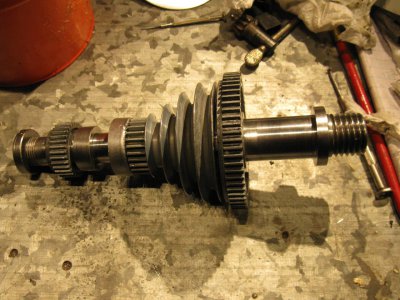
Got the spindle assembly finished last night - everything spins very smoothly without wobble, especially the thrust bearing which was a bit improvement in feel
IMG_3750.JPGIMG_3752.JPGIMG_3753.JPG

The drill chuck has been cleaned and polished, it just needs to be reassembled. I was too tired last night to want to risk screwing it up! Tool post has been cleaned and polished, and I took the back gear countershaft off this morning to leave it soaking in paint thinners while I'm at work. That stuff certainly does the job!

IMG_3750.JPG IMG_3752.JPG IMG_3753.JPG
 
Yes, But mark the ground rod as I suggested earlier before removing the headstock.

Would it work to use a ground rod and a DTI on the carriage to align the headstock after assembly?
 
Back
Top