Buying a new lathe

Re: Buying new lathe

Lookin good so far, but we are all ready to see some chips fly!! woo hoo

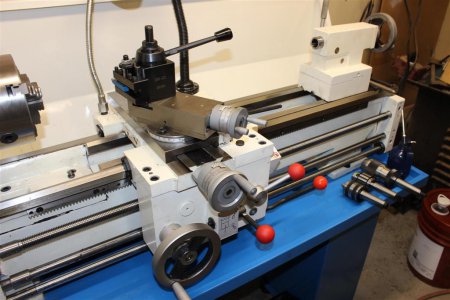
Here are my first chips. I threaded the half-nut lever to accept a ball. Red to match.

I have to tell you it makes all the difference in the world. Sooo much more comfortable!
It fits perfectly in the palm of your hand.

I plan on doing the feed lever next. Of course another matching red ball.

IMG_1377 (Large).JPG

IMG_1377 (Large).JPG
 
Re: Buying new lathe

Glad things going well. Mine was not so easy. Yeah :nuts:. We re all keeping up. You were lucky that hoist legs fit so easy. Mike
 
Re: Buying new lathe

Glad things going well. Mine was not so easy. Yeah :nuts:. We re all keeping up. You were lucky that hoist legs fit so easy. Mike

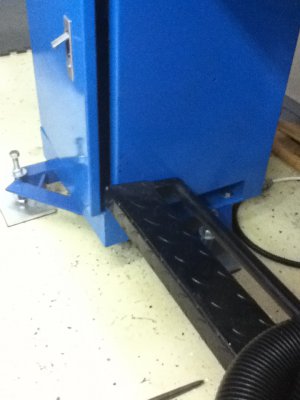
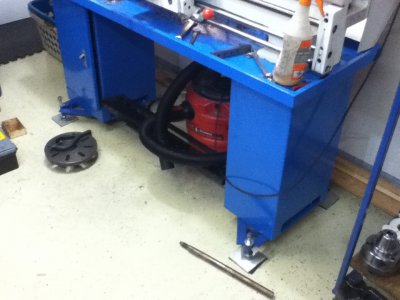
My hoist didn't fit too well either. As you can see I just hacked up the pallet it was sitting on so the legs could straddle it.:))
 
Re: Buying new lathe

Gary. Have you received any word on delivery of the QCTP yet?
 
Re: Buying new lathe

Gary I've been following along on your thread nice Lathe and looks like it was a fairly easy set up. I;m sure it will give you years of chip making.

Paul
 
Re: Buying new lathe

Gary. Have you received any word on delivery of the QCTP yet?

Matt said that he was waiting to machine it to fit the compound slide and then ship it out. I told him that I had a mill and could
do it myself so he said he would go ahead and ship it without the final machining. It was supposed to ship Friday the 28th.

I should have it this week.

He said that he should have the rest done this weekend and ready to ship by Monday (Dec 31)
 
Thanks. I haven't heard anything and I didn't want to be bugging QMT. I have looked over my machine pretty close and about the only thing I see is the cams in the spindle leave alot to be desired. Also have you installed the faceplate yet. I can't even get mine to line up with the cam lock holes in the sindle. 1 pin appears to be off.
 
Thanks. I haven't heard anything and I didn't want to be bugging QMT. I have looked over my machine pretty close and about the only thing I see is the cams in the spindle leave alot to be desired. Also have you installed the faceplate yet. I can't even get mine to line up with the cam lock holes in the sindle. 1 pin appears to be off.

I got my QCTP today. I just have to machine the mount for my t-slot. I just got back inside from the shop and my face plate fits perfectly. I'm sure Matt will send you another one.
I still need to try the 4-jaw chuck on. That's one heavy bugger!

Gary
 
Re: Buying new lathe

Guys,

I have the same lathe and they are quite good. Pretty solid, very well thought out and all the critidal areas on the basic frame of the machine are very well finished. The machine is top-heavy and left-side heavy -expected since it does not have an integral pedestal. I put about 100lbs of metal in the right side pedestal leg. Put it on solid leveling base like the ones shown here. Also, the peripherals (supplied chucks) however may need a good bit of tuning-up. On mine, the D1 backs weren't matched to the spindle. The taper angle hole in the backplates was too small and the angle did not match the nose angle on the spindle. Also, the back face of the back plates were not flat. To get consistent chuck mounting, I first surfaced ground the backside of the face plate then, matched the angle of the spindle nose and carefully opened-up the backplate hole diameter until the spindle nose taper contacted the back plate taper and still allowed the mating surfaces of the spindle face and backplate face to make perfect contact. -Hope that made sense. Also, the D1 lugs needed a good bit of fine-tuning and hand fitting.

After getting the backplate to match the spindle, I surface ground the front face of the back plate. On my own collet chuck, I new that it was perfectly square front-to-back so I just cut the usual shoulder, drilled the holes and did a fine-tune centering with zero runout by DI'd off a proof bar that was mounted in a collet. It turns out, the body is concentric with collet taper because after the initial centering, the body also DI'd within a few tens. After that, I trimmed some of the remaining shoulder off the back plate. Ever since, that chuck re-mounts within a half-thou each and every time and depending on which collet I'm using, the workpiece centers within a half thou. The face of the chuck is perfectly perpendicular to the ways to the best of my ability to measure it. That chuck is dead-on!

The 4 jaw was not flat and parallel from front to back. It was off about a thou and a half so, in addition to tuning-up it's backplate as described above, I had to surface grind the rear side of the chuck then, do the rest of the installation. That behemoth was hard to work with!

I mount 3 jaw chucks similar to collet chucks. After getting the backplate tuned up, I mount a proof rod in it's jaws and center on the backplate while indicating off the proof bar. I noticed that the jaws were holding the piece with a slight angle so I tuned-up the jaws until it held straight. In the case of the 3 jaw, the backplate rim indicates dead-on but the body is off by 3-4 thou. Since the face was perfectly perpendicular to the ways, I didn't care that the body was slightly out. All you are concerned about is a flat, perpendicualar face, straight jaws and pieces that center. For most diameter pieces, the 3 jaw centers within about 1.5 thou, some cases almost dead on. That's about all you can ask of an independent chuck.

Let me know if you want pics of the backplate tune-up. I have another chuck that needs mounting so I'll take pics as I go.

BTW: I have a procedure for static balancing chucks. It works pretty well. Let me know if you want to hear about it. It's all slow speed balancing techniques... WARNING: when you mount those new chucks, they might be pretty out of balance (mine were) so work your speeds up slowly.

Ray

Gary I've been following along on your thread nice Lathe and looks like it was a fairly easy set up. I;m sure it will give you years of chip making.

Paul

IMG_0006.JPG IMG_0008.JPG
 
Re: Buying new lathe

Guys,

I have the same lathe and they are quite good. Pretty solid, very well thought out and all the critidal areas on the basic frame of the machine are very well finished. The machine is top-heavy and left-side heavy -expected since it does not have an integral pedestal. I put about 100lbs of metal in the right side pedestal leg. Put it on solid leveling base like the ones shown here. Also, the peripherals (supplied chucks) however may need a good bit of tuning-up. On mine, the D1 backs weren't matched to the spindle. The taper angle hole in the backplates was too small and the angle did not match the nose angle on the spindle. Also, the back face of the back plates were not flat. To get consistent chuck mounting, I first surfaced ground the backside of the face plate then, matched the angle of the spindle nose and carefully opened-up the backplate hole diameter until the spindle nose taper contacted the back plate taper and still allowed the mating surfaces of the spindle face and backplate face to make perfect contact. -Hope that made sense. Also, the D1 lugs needed a good bit of fine-tuning and hand fitting.

After getting the backplate to match the spindle, I surface ground the front face of the back plate. On my own collet chuck, I new that it was perfectly square front-to-back so I just cut the usual shoulder, drilled the holes and did a fine-tune centering with zero runout by DI'd off a proof bar that was mounted in a collet. It turns out, the body is concentric with collet taper because after the initial centering, the body also DI'd within a few tens. After that, I trimmed some of the remaining shoulder off the back plate. Ever since, that chuck re-mounts within a half-thou each and every time and depending on which collet I'm using, the workpiece centers within a half thou. The face of the chuck is perfectly perpendicular to the ways to the best of my ability to measure it. That chuck is dead-on!

The 4 jaw was not flat and parallel from front to back. It was off about a thou and a half so, in addition to tuning-up it's backplate as described above, I had to surface grind the rear side of the chuck then, do the rest of the installation. That behemoth was hard to work with!

I mount 3 jaw chucks similar to collet chucks. After getting the backplate tuned up, I mount a proof rod in it's jaws and center on the backplate while indicating off the proof bar. I noticed that the jaws were holding the piece with a slight angle so I tuned-up the jaws until it held straight. In the case of the 3 jaw, the backplate rim indicates dead-on but the body is off by 3-4 thou. Since the face was perfectly perpendicular to the ways, I didn't care that the body was slightly out. All you are concerned about is a flat, perpendicualar face, straight jaws and pieces that center. For most diameter pieces, the 3 jaw centers within about 1.5 thou, some cases almost dead on. That's about all you can ask of an independent chuck.

Let me know if you want pics of the backplate tune-up. I have another chuck that needs mounting so I'll take pics as I go.

BTW: I have a procedure for static balancing chucks. It works pretty well. Let me know if you want to hear about it. It's all slow speed balancing techniques... WARNING: when you mount those new chucks, they might be pretty out of balance (mine were) so work your speeds up slowly.

Ray

Ray,

I think I've been pretty lucky. Both chucks and the faceplate seem to be balanced and running true. I would like to see your procedure for truing and balancing one. Maybe a separate post so all can see it.

How long ago did you get your lathe?

I know the footprint for the lathe is pretty small. I have already drawn up plans for fixing that. I'll post it when I get it done.

I did get my QCTP all machined and installed. A lot better that the clunky 4 way that came with it. I plan on replacing it also when a different one that I bought arrives.

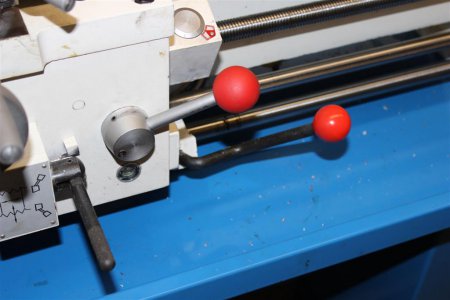
The first thing I did after installing it was to thread the feed handle and add another ball. I can't tell you how much better they feel and they also give you better control.
They look cool also. I plan in installing another smaller ball on a carriage lock that I will add. I can't use a store bought on since it's too close the the DRO scale.

Here's a pic:

Knobs and QTH (Large).JPG

Knobs and QTH (Large).JPG
 
Back
Top