Balanced Grinder Hubs

Ray C

Registered
Registered
Joined
Nov 16, 2012
Messages
5,596
Several people are getting into surface grinders so, I'll post some experiences with making a balancing grinder hub. Even though I haven't finished the turret tailstock, I'll start posting some of the photos of prior work so interested folks can get a move on it.

It's more tricky than you might imagine and I had to screw it up 2 times before finding the right sequence of operations for it to come out properly. An experience machinist might have less problems and I'm open to suggestions. The critical part is concentricity of the tapered bore WRT the outer spindle diameter that the wheel goes onto. The taper angle must be perfect -no room for error and if that concentricity is not within +/- 0.00025, there's no hope for it for precision grinding. Mark it and only use it for coarse grinding. The wheel cylinder part must be 1.2495 +0.0003 -0.0000. The backing plates can be off a little (+/- a thou) because the buffer pads will absorb the error.

Here are some starter photos and explanations.

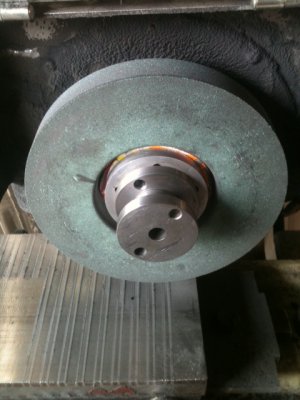
Here's a finished product that is not yet heat treated but is otherwise finished. I've been using it for a few months now. Shown is the backside with the dual balancing weights. Those weights must be secured properly and the circular groove must have adequate depth to ensure a good fit. CAUTION: Never use any grinding wheel without a safety cover. My safety cover is home made and has a front door that covers the front of the wheel. -And for the record, the balancing mechanism here is nothing new; this design has been around for many years. Although you can't see it in the photo, there is a circumferential groove that the cap screw fits into to aid secure attachment. Also shown is the locking nut as well as a view of a mounted wheel. Of course, you'll need to make a spanner wrench. -And don't forget to use all left-hand threads if your machine spins in the clockwise direction while facing it from the front.
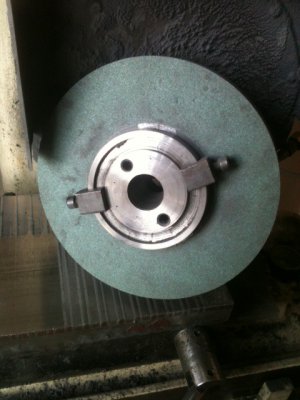
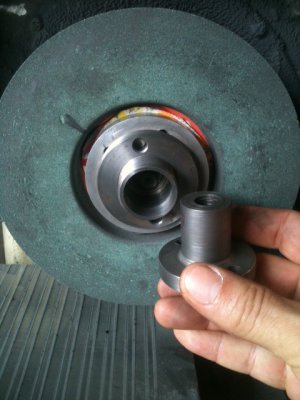
Backside Balancers.JPGLocking Nut.JPGMounted Wheel 1.JPG

The wheel must be balanced prior to spin-up. You'll need to make an off-site balancing arbor and balancing apparatus such as this. It mimics the SG spindle shaft. This is one of those projects where you need to make a lot of parts just to make the part... Anyhow, you mount a wheel on the hub without the balancing weights, put it on the balancing apparatus, find the heavy side and place the weights equally on the opposite side of the heavy end. The balancing weights are just some milled pieces of metal with a cap screw.
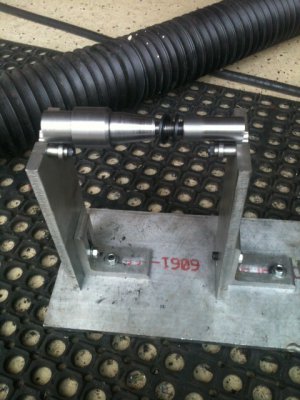
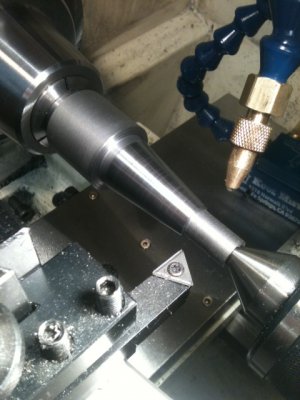
Balancer Arbor.JPG TaperedShaft-Jig.JPG

Here's a raw hub. I make them from two pieces to save materials and a lot of swarf clean-up. It's 1045 and was welded in the raw HR condition then, fully stress relieved and soft annealed. When it comes time to lathe these down to size, those weld caps will come off like butter.
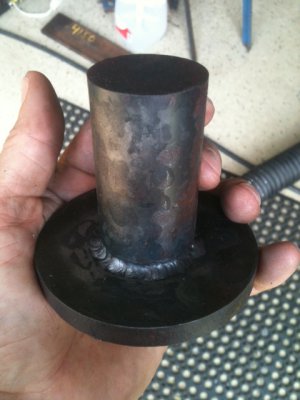
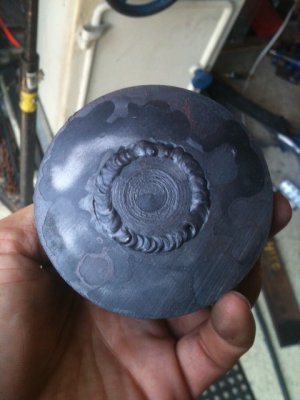
Raw 1.JPGRaw 2.JPG

Here's a piece of O1 heat treated to 60 RC and was my attempt at making a parallel bar. It's pretty good and I use it a lot for different things. If the SG hub is not perfect, every wobble it induces in the wheel will show-up in the grind piece. This particular grind came-out OK. I'm still practicing and teaching myself how to use a grinder. There is almost no information out there on how to use one...
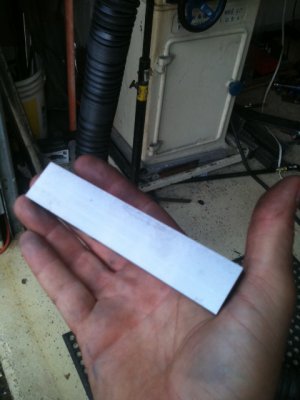
photo.JPG

OK, that's it for now. We'll pick-up on this later. I'll cover the sequence of operations starting from the raw hubs and will also include how I made a taper reamer.

Ray

Backside Balancers.JPG Balancer Arbor.JPG Locking Nut.JPG Mounted Wheel 1.JPG photo.JPG Raw 1.JPG Raw 2.JPG TaperedShaft-Jig.JPG
 
Thanks for the excellent post Ray. I know it's a bit of a thick question but are the balancing weights visible in the first picture? I am not sure what they look like at all as I am new to this whole grinding thing. Thanks again for taking the time to put this up and help us neophytes out.

Paul.
 
Yes, in the very first picture, look at the two "ears things" that are held down with cap screws. Those are the balancing weights and are located on the backside of the hub. You start-out by mounting the wheel on the hub without the weights then, put it on the stand-alone balance unit to find the heavy side of the wheel. Then, the balance weights are placed on the opposite side of the heavy part of the wheel. You cannot use just one balance weight as, it would have to match exactly how much the wheel is off balance therefore, you use two balance weights which makes a triangle. A triangle of weights can be balanced without the need to exactly match the amount of counter balance. When this wheel runs, you only hear it. You don't feel it. If you move one of those weights a tiny bit, you can feel it. If you can feel it, it will show-up in your grind.

Some words of caution: These things are not toys and those spinning weights must be attached securely. Once again, this design is very old and till this day, there are commercial balancing hubs which work exactly like this. It is not a new idea.

BTW: I completely understand the dangerous nature of grinding wheels and it's a touchy topic. If the other mods wish to cancel this thread and delete, there will be no fuss from me. I did this project a long time ago and did not post it due to serious nature of this kind of work.

Ray


Thanks for the excellent post Ray. I know it's a bit of a thick question but are the balancing weights visible in the first picture? I am not sure what they look like at all as I am new to this whole grinding thing. Thanks again for taking the time to put this up and help us neophytes out.

Paul.
 
  • Like
Reactions: ome
Several people are getting into surface grinders so, I'll post some experiences with making a balancing grinder hub........................................................

Ray

Ray,

Thanks for posting this project. Charley Davidson and I have one surface grinder wheel adapter between us. We were just today discussing trying to make some more adapters since they are so expensive. We will be eagerly watching your post to learn your experiences.

We were also discussing making the install and removal tools. Have you also made your own tools? I have the pattern adaptor and Charley has the pattern tooling. We both need the knowledge from your experience.

Benny
The Orphanage Never Closes
 
I have yet to come across a wheel that balances well even after truing it up. The wheel shown is a Norton costing over $120. It does not self-balance. I have a dozen or more ranging in price from 30 to $150. The only ones that self balance (only 2) are 3/8" wide and 6" diameter. I prefer 7 and 8" wheels as they last longer and with VFD, can spin them down to get the SFM right.

I had two wheels that were $50 each (from MSC) one was so out of balance, it blew up inside the 1 minute spin-up. The other was so bad, it would not balance even with this setup so, I took a hammer to it and thew it in the trash. MSC would not take a refund BTW...

If you come across a brand that's affordable and self balances, let me know please -and I'm not kidding about that.


Ray


Excellent post Ray and I thank you for it and eagerly await the next installments.

While talking to the guys at Sopko and especially to David Haviland (GREAT guy) at Precision Spindle up in Ontario they both led me to believe that balancing weights are not a necessity and are really more trouble than they're worth if you don't keep an adapter in each wheel you have.
They said that especially in the 8" and under sizes that a quality wheel will be balanced very closely and that dressing it will make it about perfect.

Again, Thank you for this great thread!

- - - Updated - - -

I have yet to come across a wheel that balances well even after truing it up. The wheel shown is a Norton costing over $120. It does not self-balance. I have a dozen or more ranging in price from 30 to $150. The only ones that self balance (only 2) are 3/8" wide and 6" diameter. I prefer 7 and 8" wheels as they last longer and with VFD, can spin them down to get the SFM right.

I had two wheels that were $50 each (from MSC) one was so out of balance, it blew up inside the 1 minute spin-up. The other was so bad, it would not balance even with this setup so, I took a hammer to it and thew it in the trash. MSC would not take a refund BTW...

If you come across a brand that's affordable and self balances, let me know please -and I'm not kidding about that.


Ray

EDIT: My plan here is to have a hub for each of the wheels. Also, these hubs can be removed from the SG w/o upsetting the balance. I can reinstall a wheel and run it.
 
Benny,

The only tools I've made are the hubs, the various spacer rings, locking collar and locking nut. Also some spanner wrenches and a device that looks a little like a ball-joint separator to get a hub off the spindle. It's not good to grab a wheel by the sides and yank it off.

I do not understand what you mean by the pattern adapter. If you hum a few bars, I'll try to whistle along. I can post a CAD drawing of this design but, I have since modified a few of the dimensions and the print is slightly out of date. -Probably doesn't make a difference as I'm assuming your spindle has different dimensions and backside clearances anyhow. I'll gladly post the CAD drawing if you want it.

Ray


Ray,

Thanks for posting this project. Charley Davidson and I have one surface grinder wheel adapter between us. We were just today discussing trying to make some more adapters since they are so expensive. We will be eagerly watching your post to learn your experiences.

We were also discussing making the install and removal tools. Have you also made your own tools? I have the pattern adaptor and Charley has the pattern tooling. We both need the knowledge from your experience.

Benny
The Orphanage Never Closes
 
Ray, the funny thing is that despite buying my grinder completely tooled up and with all the accessories, I don't have a single balancing hub. I have 17 hubs that came with the machine yet none that have a balancing mechanism. It came with a bunch of wheels that seem to be high quality that are a mix of German, Swedish and Danish origin. I will make a balancing stand and see how they look,

On a side note, I did get a few pulley wheels and am inclined to spin the wheels below their rated speed to ensure I am keeping things safe. The machine terrifies me and I understand your hesitation to post your work up. My uncle was hit by a wheel that flew apart and had an artery severed. If not for my other uncle visiting on the off chance he would have bled out in his shop. I cannot stress the need to work smart and safely enough with these machines.

Paul.
 
I recommend trading those socket head cap screws for set screws. The SHCS's stick out too far and set screws won't,making it possible to grind things that the socket heads might accidentally strike.
 
I totally agree and as a matter of fact, I want to design a much less obtrusive weight to hang on there. The ones I made were quickies just to see if the darn thing worked or not.

I concur... Safety can be augmented with better design here. -And I will do it.


Ray


I recommend trading those socket head cap screws for set screws. The SHCS's stick out too far and set screws won't,making it possible to grind things that the socket heads might accidentally strike.
 
Ray, when i used to grind paper machine rolls, We balanced all our wheels. Mind you these were 30 inch wheels 4 inches wide. Anyways , we made our own balance weights. Our mandrells had a groove around them for the weights. the edges of the groove were tapered, like a dovetail. so when you tightened the weights they locked against the taper. Im hoping this makes sence. We would machine a piece in the lathe the same diameter as the groove in the mandrel with the same angles on it. then we would lay out the individual weights around this circle and cut them out. so now we had about 16 to possibly 24 balance weights. we would put match marks on every weight, then drill them for a set screw. Then we cut them diagonally right across the set screw hole. so now they look like two wedges.you would slip each side in the grooove on the mandrel and line up the two halve of the set screw hole and put your set screw in as you tightened. it wedged itself in . i made these weights out of brass or bronze usally. so i never had any issues getting the set screws out later. i also used a very good scale and balanced the weights so they all weighed the same. When i balanced i would find the heavy spot and put one weight exactly opposite it. For explanations sake we will call where that weight is 0 degrees. Then i put a weight at 90degrees and another at 270. i would then move these 2 weights together to acheive balance. I hope i havent confused you, but i ground rolls for over 10 years and i balanced alot of wheels. These weights fit inside the balance groove and nothing protruded out. If your making your own mandrels. you just have to bevel those edges of the groove after trepanning it out. Hope this makes sence, If i was currently working id just take a pic and it would be self expanitory.But im currently out receiving radiation treatments and facing surgery, so it will be a while b4 i go back to work. If my explanation is unclear i may could draw a pic. Also Ray, I would balance a wheel, mount it on the grinder and dress it,Then take it back off and balance it again. My coworkers dressed the wheel then balanced it. they didnt balance it first. these were very good quality wheels Nortons and pacers mostly but i never like putting an un balanced wheel on the grinder even though truing it up does change the balance a little.
 
Back
Top