Amount Of Material Removal On Spring Cut

Try this: Assuming that you are not making thousands of parts.

Make several rough and finish passes at the start well before finish diameter, note which DOC and feedrate gives the desired finish, write this down.
The difference will be the spring with that tool, material, speed and feed.

Rough the part close to finish leaving enough room to do the above again near final size, Use the same parameters at near finished size. The spring will change as the diameter and other conditions change.

Good Luck

That's definitely the plan for next time!
 
Quote from pstemari, post: 358238, member: 38046 "Setting the tool below center reduces the rake and increases the clearance. It's also going to increase the inward force on the tool."

There is a lot of discussion on this in the above referenced thread. It seems to have to do with the cutting forces on the tool. I personally could never really explain why it works.
Thanks, I haven't a clue either.
However the above quoted post is confusing, whilst understanding increasing negative rake and increasing clearance (if ones does not touch the tool to the part the clearance is 100%) the increase in tool force claim is fascinating. and requires explanation.
 
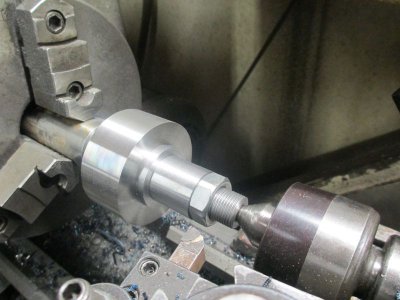
Here is an example. I did this with no spring at all. The lathe is a 25 year old Jet GH1340. The part is 4150, the large diameter is about 2.75 As I was taking the roughing cuts I kept lowering the tool bit on each pass until I got no drag marks on the return. The result was that it cut exactly what I dialed in, it didn't matter if I dialed in 0.030 or 0.005. This is the only example that I have pictures of but I have done this with well supported parts as small as 3/16 diameter.

IMG_0617.jpg

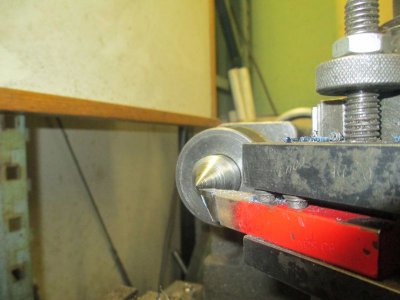
And here is the tool height, about 1/8 below the center

IMG_0621.jpg
 
Thanks, I haven't a clue either.
However the above quoted post is confusing, whilst understanding increasing negative rake and increasing clearance (if ones does not touch the tool to the part the clearance is 100%) the increase in tool force claim is fascinating. and requires explanation.
When below center the work is trying to climb up on top of the tool, pulling the tool under itself (disaster if it succeeds, of course).

Another way to look at it is that the force exerted on the tool by about-to-be-removed material is tangential to the work. When on center that force is straight down. When below center that force has a component in the +X direction, pulling the tool in.

When you get things just right that inward force cancels just enough of the force pushing the tool in the -X direction that all the remaining forces and resulting deflections add up so that the cutting edge ends up at exactly the same radial distance from the centerline as it would with no force at all.
 
Here is an example. I did this with no spring at all. The lathe is a 25 year old Jet GH1340. The part is 4150, the large diameter is about 2.75 As I was taking the roughing cuts I kept lowering the tool bit on each pass until I got no drag marks on the return. The result was that it cut exactly what I dialed in, it didn't matter if I dialed in 0.030 or 0.005. This is the only example that I have pictures of but I have done this with well supported parts as small as 3/16 diameter.

View attachment 119650

And here is the tool height, about 1/8 below the center

View attachment 119651

Ok correct me if I'm wrong but at .125 below center you wouldn't be touching a .1875 part.
 
Ok correct me if I'm wrong but at .125 below center you wouldn't be touching a .1875 part.

Great observation! You are absolutely correct! :encourage:

I should have clarified my statement above, I'm not suggesting that the tool always needs to be 0.125 below center. But rather some proportional amount of the diameter determined by trial & error. As the diameter gets smaller, the drop would be decreased. For example, I had to turn down some SS shafts from 0.500 to 0.375 the other day. By trial & error the tool wound up about 1/16 low where I got the best result.

I suspect there are a lot of variable involved here, so my guess is that it would be very difficult to calculate the drop. But to figure it out only takes a few passes.
 
Most if the guys I've watched their videis say they measure then cut half the amount needed then measure again.

Me it depends on how close I need & how much needs removed. I just started the other day while facing after hitting center I backed out to the size needed +.050" & made a mark with my cutting tool on the end then hogged down to that mark. I then zeroed & took a spring pass. That is where I start getting careful. I take .010" cuts until I get to the last .010" & measure after aspring cut. This is where i sneak up on it.
 
One place I worked did what was called a "mic check" pass, leaving 0.015 on the finished diameter. If it was not exactly 0.015, a tool offset was used to correct it. These were heavy, stout CNC machines for the most part. The smallest was a Mazak QuickTurn 20 as I recall. Not much give in any of the machines, but of course, always some, even if minuscule, in the part.

In practice, my approach has usually been to slow down the DoC as I get within say, 0.100 of finished size. Since it's sometimes hard to get finish with a whisper cut anyway, I try to avoid cuts of a 0.001-0.002. If I hit target at 0.025, I stay with it all the way. There is very little change (until you get to really small diameters) in the cutting forces and relative tool position relative to working surface when removing the last 0.100.....so if it hits all the way down to the last 0.025, that is what the finish pass is.

There are of course exceptions to that, but that's normal unless the tolerance is very low. The larger the tolerance, the more aggressive I get. Finish cut might be 0.100 on some things.

As far as a spring pass goes, I use them on closely held dimensions. I may leave 0.010-0.015, run a spring pass......and make my final pass based on how much material the actually removed, regardless of dial, indicator, or DRO.
 
Back
Top