A degree wheel for the Atlas/Craftsman 6X18

This looks useful, and in the junk box I have a very light duty dividing head like object - I think it was part of an animation stand- I pulled out of the trash 15 years ago. 3" diameter, marked with 360 degrees at the perimeter and with a not very useful set of divisions at 36,24, 20, 15 and 10. At least I can use part of it as a degree wheel and possibly thread the detent pin side to fit the spindle and beef up the pins? A neat idea and a good excuse to use up, practice and possibly destroy junk.
 
Wow, what luck, pebbleworm. Of course, pics would be nice...
 
Wow, what luck, pebbleworm. Of course, pics would be nice...


Yes, pics please.


I have looked things over and I am going to get a 6 inch aluminum disc 1/2" thick and put it on my rotary table, mounted on my lathe bed and engrave 360 markings around it. Then mount it to the back side of my chuck after boring the center to fit snugly over the back plate and up against the rear side of the chuck and hold it with 3 well placed tiny 6-32 set screws. The markings will look like they are part of the chuck and be right out where they are easy to see. but first, I have to go find a piece of 1/2" aluminum plate or round. and I read about the concern using aluminum with the expansion flap. Once mounted to a tight fit on the backing plate and up against the rear of the chuck the negligible expansion is not going to be a problem as on that diameter , the distance between the 1 degree marks is .055". and yes , there will be pics as soon as I make this thing.

Mark Frazier
 
I've just had a thunk perhaps not a bright one , but a thunk after all :lmao:.

If you first glue then screw the finished engraved aluminium indicator to the headstock body & use a simple magnetic mounted scriber set up on the chuck or work piece . When you have chosen the points you want , with a cutting tool in the tool holder use either the cross slide or the top slide to to mark the point on the part held the chuck .

That way you can make the marks whether you are using a three , four of five jaw chuck etc or a face plate .
The beauty of this idea is that there will be very little error , for the scriber point can be set exceedingly close to the engraved graduation mark . whereas with a fixed pointer on the casing it would mean you'd have to look at the alignment from exactly the same angles every time you chose to mark things out using the indicator.

Another advantage of my idea is that when you have marked things on the work piece you remove the magnetic scriber & block so there is simply no chance of it catching up long turnings of metal swarf , whereas an indicator /pointer permanently affixed to the casing does have a chance.


Thirdly ..... Errr errr hummmm ... well there's bound to be one .:lmao:

Ha Ha ... Goddit ........ You can use a thin plate for the disk instead of a turning a big thick slab of metal & having to balance it on the spindle end by the chuck , I dare say you might only need 180 to 200 degrees of a circle as well for who looks under or at the back of the chuck to pick up or make marks on their work ?
 
Last edited:
Well, it's obvious that there's a lot of sharp pencils in this box. I knew I would like this forum.

It would be great if you folks could post up pics of your creations...
 
Mark,
I experienced similar pain. I wanted to print a few pages of graph paper to make an accurate scale drawing. There are several sites that offer different types (Cartesian, Engineering, Hexagonal, etc) and scales in either inch or metric. I have a Canon Pixma MG5400. It does wonderful for pictures, text, CDs but, no matter how I adjust the print size percentage, I cannot get a graph paper grid that equals a ruler (scale).
Paul
 
The HP Print Manager software, that came with HP printers, manages the print queue and provides scaling. Works ok for me.

The Intergraph SmartSketch software also has a scaling feature, adjustable for both X and Y independantly, and is great for fine-tweaking of scaled drawings.

However, the stuff I'm using is 10+ years old. Not sure about current offerings...
 
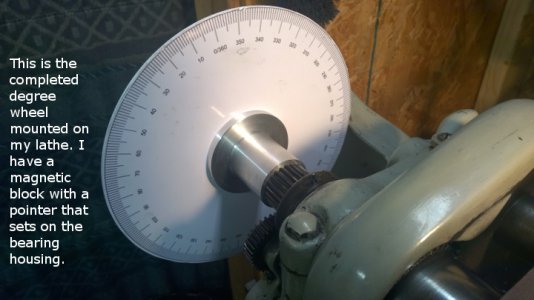
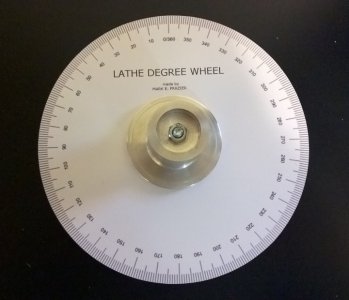
Well guys......I am still looking for an aluminum round to make my degree wheel for the back of the chuck , but yesterday I needed one so I made a quick one. Took about an hour. I put this in the members projects forum so others may use it if they like. I am posting a photo here to let you know what I came up with. I am still going to make the one for the back of the chuck as soon as I find the material at a reasonable price.

Mark's degree wheel.jpgcompeted degree wheel.jpg
The pointer isn't shown here, but it is magnetic and just sticks to the rear bearing housing. Only takes seconds to put on or take off. It mounts in the rear of the spindle and a brass thumb screw holds it in place.

It was made by printing the degree wheel I downloaded from the net on a sheet of photo paper and gluing it to a plastic disc made from a sheet of white plastic scavenged from an old scanner and mounting to an aluminum hub I quickly turned from a scrap piece of aluminum round. all held together with a 1/4" bolt and a fender washer. The glossy photo paper makes a really sharp and durable printing. :))

Mark Frazier

Mark's degree wheel.jpg competed degree wheel.jpg
 
Wow, Mark. That looks so professional ... it's ...... frightening...
 
Back
Top