- Joined
- Apr 20, 2011
- Messages
- 430
Note that I am in no way am saying this is THE way to do this, it is the solution me and my good friend came up with and seems to have come out pretty well -- no doubt there are different and better ways, YMMV...
Am doing a major rebuild of my 1944 SB 10 and as is to be expected, the lead screw and half nuts were very worn. While the half nuts are available, getting the 52" lead screw just wasnt likely to happen. I had heard of a source for lead screw grade thread stock, so 'a-googling' I went, and quickly found the source --
roton.com
They have any kind of thread/sizes/pitch lead screw thread stock and the nuts you can imagine. The 10L was needing 3/4-8 and the length of thread I would need was 42". They sell it by the foot, so I orderd up 4" with a brass nut (note: they have a $60 minimum) cost was just shy of $100. This is strictly thread stock, you will have to cut it to size and do any machining - like in this case, I had to cut to my needed 42", machine the tail stock end for the tail bearing and prepare the gear box end to accept the cut-off part of the old screw. (That 6" piece of cut-off sure did come in handy later ---) When I got all that done, I had to get the get the 3/16" key slot machined down the length of it.
Setting up to cut off the old threads and machine a 1 1/2" spigot to fit into the end of the new threads
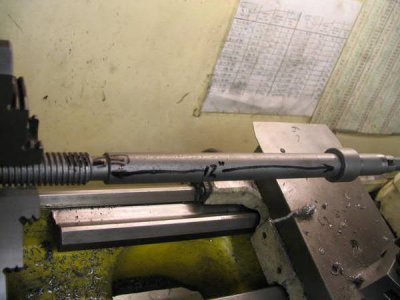
Ready to slip it into its new home, I used red loc-tite and two 1/8" roll pins to secure it together
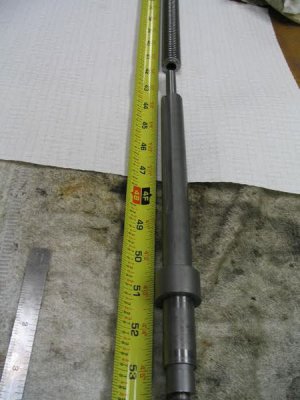
Set up on the mill table to machine the key slot with a 3/16" end mill - on reflection, if I do it again, I think I would set it up to use a slitting saw...
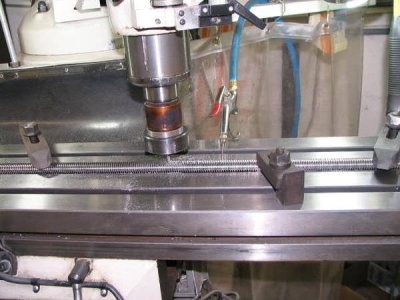
Next was to get the half nut taken care of. Here I must pause and give much credit to my good friend and skilled machinist, Lane, who has guided me through this large undertaking, and in the case of these nuts, he actually did the set-up and machining (I was really nervous about me doing those half nuts and messin them up) Its obvious the the new nut was somewhat shorter than the length of threads on the original nuts, but I think it will be fine for my uses - especially compared to the originals!!
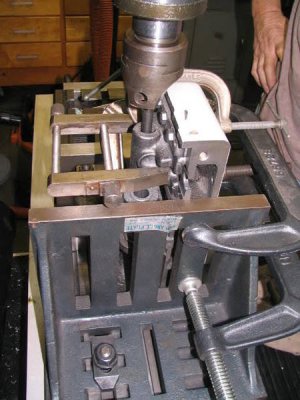
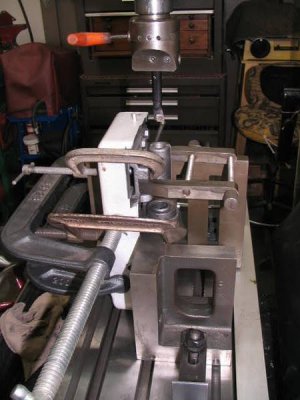
Getting set up to do a job is one of the areas that my inexperience shows, and Lane shines in setting up a machining operation, heres a couple pics of the way he did the boring out of the half nuts..
Here we're setting up the nuts to determine the size of shim to put between the them before cleaning out the old threads - this is where that 6" piece of extra thread really came in handy. When a proper size shim was inserted and clamped down on the scrap thread piece while in the nuts and it turned smoothly, it was ready to go to the mill.
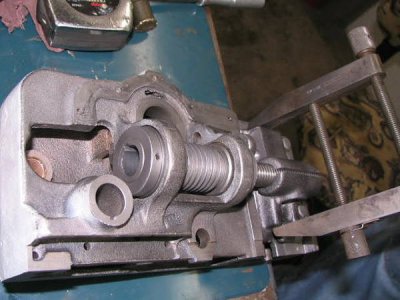
A right and a left view of the set-up for boring, using the machined surfaces of the apron as reference points.
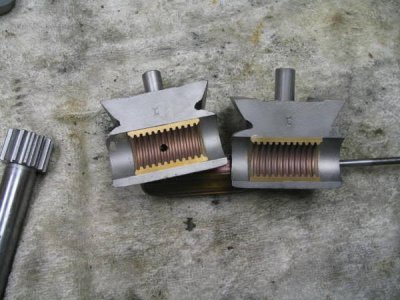
The new nut was turned down to the size of the freshly bored nuts and put in place to silver solder in, when done, sawn in half and machined flush and ---- there it is!
Am doing a major rebuild of my 1944 SB 10 and as is to be expected, the lead screw and half nuts were very worn. While the half nuts are available, getting the 52" lead screw just wasnt likely to happen. I had heard of a source for lead screw grade thread stock, so 'a-googling' I went, and quickly found the source --
roton.com
They have any kind of thread/sizes/pitch lead screw thread stock and the nuts you can imagine. The 10L was needing 3/4-8 and the length of thread I would need was 42". They sell it by the foot, so I orderd up 4" with a brass nut (note: they have a $60 minimum) cost was just shy of $100. This is strictly thread stock, you will have to cut it to size and do any machining - like in this case, I had to cut to my needed 42", machine the tail stock end for the tail bearing and prepare the gear box end to accept the cut-off part of the old screw. (That 6" piece of cut-off sure did come in handy later ---) When I got all that done, I had to get the get the 3/16" key slot machined down the length of it.
Setting up to cut off the old threads and machine a 1 1/2" spigot to fit into the end of the new threads

Ready to slip it into its new home, I used red loc-tite and two 1/8" roll pins to secure it together

Set up on the mill table to machine the key slot with a 3/16" end mill - on reflection, if I do it again, I think I would set it up to use a slitting saw...

Next was to get the half nut taken care of. Here I must pause and give much credit to my good friend and skilled machinist, Lane, who has guided me through this large undertaking, and in the case of these nuts, he actually did the set-up and machining (I was really nervous about me doing those half nuts and messin them up) Its obvious the the new nut was somewhat shorter than the length of threads on the original nuts, but I think it will be fine for my uses - especially compared to the originals!!
Getting set up to do a job is one of the areas that my inexperience shows, and Lane shines in setting up a machining operation, heres a couple pics of the way he did the boring out of the half nuts..
Here we're setting up the nuts to determine the size of shim to put between the them before cleaning out the old threads - this is where that 6" piece of extra thread really came in handy. When a proper size shim was inserted and clamped down on the scrap thread piece while in the nuts and it turned smoothly, it was ready to go to the mill.

A right and a left view of the set-up for boring, using the machined surfaces of the apron as reference points.


The new nut was turned down to the size of the freshly bored nuts and put in place to silver solder in, when done, sawn in half and machined flush and ---- there it is!


