2017 POTD Thread Archive

Jim, you need to use one of your log splitters to make a compactor for your plastic chips. It compresses nicely and your trash man would probably appreciate it, unless you made the cubes too dense and heavy.
 
I have the ability to get some of that hdpe for free! It is cut in 2 x 4 and 2 x 6 inch x 6 foot sizes. I guess I should grab some. I thought that I could use it for jigs in my wood shop. I didnt realize it was so expensive.
 
Jim...
Of that $1000 sheet, how much ends up in the bag?
 
Jim...
Of that $1000 sheet, how much ends up in the bag?
Not really very much, maybe 15% or so. The stuff is just really fluffy. I just have the router work done, I'll generate another 30 gallons of chips before the job is done. Still have to radius the edges, and then cut some pockets with the mill.
 
My POTD (actually, yesterday's) was finally repairing the speed control on my Clausing 1501 lathe.

These beasts have a variable speed pulley on the motor and the motor is raised and lowered by a hydraulic ram operated from the speed control knob in the control cluster. A cam on the end of the speed knob presses on and moves the piston in the master cylinder to create the motion at the slave. Kind of a Rube Goldberg arrangement but works OK - but the way it is arranged the hydraulics will creep back under pressure from the motor weight / slave cylinder and you end up back at low speed all the time. Clausing compensated for this with a torsion spring to counterbalance the back pressure. A lovely arrangement unless the spring goes "ba-zoing", which mine did regularly since the day I got the lathe. Time after time I cobbled it back together after installing the lathe but always wanted it to be 'right'.

After the most recent ba-zoing I broke down and ordered a replacement torsion spring. (~$250). Spendy but it's nice to still have parts available from the factory and I have cursed and swore at the broken one long enough.

Installation went pretty smoothly, I used one hand to hold the spring unit in place, another hand to keep pressure on the retaining plate, another hand to install the keyed washer and the last hand to install the spring clip. Hmmm . . . . well, since that really wasn't going to happen I called up a buddy with the extra hands and it went together in a snap and now my speed control is back to 'factory'.
 
I finally make a lid for my pickle jar. Basically, those bulk jars of pickles, when you are done eating a whole lot of pickles (hint - invite friends and family over for a lot of burgers), make great devices to see the color of brake fluid. I ran a proof-of-concept using the original lid with holes drilled through it for brass fittings before deciding to make it more permanent. Turned some 4.25" aluminum round down, bored through it and tapped that for the hanging rod, turned an inside lip, and knurled the outside.

I did have to buy a small 3" rotary table (fit my lathe milling attachment perfectly) to cut the bayonets used to attach the lid to the jar and snug it up. Then I assembled it :

IMG_7480.jpg

IMG_7481.jpg


It sure makes it easier to plead brakes - just hook up a vacuum source to one, run the other fitting to the brake caliper zerk, then crank up the vacuum, open the zerk, and keep it topped off at the master cylinder until you have clear fluid (or fluid at all if bleeding a dry system, which is what I was doing). Then, close the zerk, remove the vacuum, and top it off before proceeding to the next one.

And, while I was at it, I had a neighbor who needed some thumbscrews for a camera gimbal. So, I turned them down and took the time to gain more experience with knurling :

IMG_7482.jpg
 
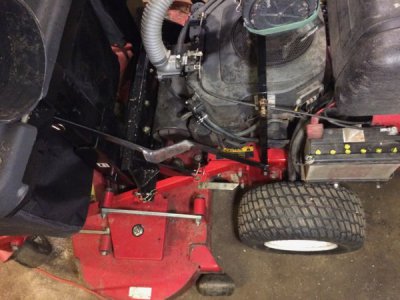
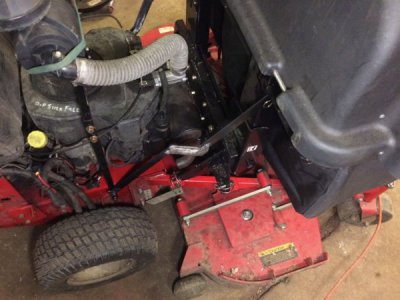
Awhile ago, I made a bagger setup for my large walkbehind mower, and as part of it, there are two support braces that go on little stubs I welded to the mower's frame, with an r-pin to hold the brace on the stub.

But I had to move those stubs because the supports for the new air cleaner I installed are right in the way of the braces if I left them there. So, I cut the stubs off and welded them to the air cleaner supports. This actually turned out better than before, because now I could weld the stubs on at my workbench, so the pieces could be horizontal, vs welding them on the frame (the surface is vertical, so I have to weld vertically and underneath).

As well, I had to fix the braces, as the distance between the two 'stubs' they go onto is about an inch closer. As well, I decided to get fancy and do the braces like the OEM ones were, and bend & support the braces between the two stubs on each side are offset from each other (the pics show how they are offset).
IMG_0870.jpg
IMG_0871.jpg

As a bonus, with the new air cleaner setup, I've noticed that the motor actually seems to start easier. Before it seemed to always need a couple of tried with the choke on, and with a couple of seconds of cranking before it starts, but the couple of times I've started it with this new air cleaner, it's started almost immediately on the first try. I'll see if it's just playing with my mind or if it's for real over the summer...
 
I put the finishing touches on the hydraulic clutch conversion for my XS650 project bike today. The slave cylinder piston has a hardened ball captured in it's center and I didn't want to leave the contact area between the pushrod and that ball exposed the dirt and chain mung. I machined a thin cap from 6061 aluminum to cover that area. The OD of the cap is .010" smaller than the OD of the piston so it can retract right into the cylinder is need be. The pushrod is .315" diameter and I machined a step on it down to .265" and bored a hole through the cap to .270". The step on the rod captures the cap so it cannot move away from the slave piston and will also hold in some high temp grease. The step on the rod is .005" from touching the cap when the center of the rod touches the ball.
Before I put it back together I heat treated the ends of the rod to harden them for wear resistance.

20170430_121839_zpsbhiscpyi.jpg


20170430_121903_zpsoruiu6n9.jpg


20170430_121919_zpseeahndoc.jpg


20170430_121924_zpsjbydmsv1.jpg


20170430_123434_zpsvd3en0ra.jpg


20170430_123443_zpsasvfj2tv.jpg


20170430_124928_zps42ozi2rc.jpg


20170430_125054_zpsl24j2sdo.jpg


20170430_125338_zpsacppvmak.jpg


I also decided to change the rear sprocket size to 36 teeth from 32. I bought another weld-on sprocket blank and machined it to fit my custom hub.

Center bored to size and ready for bolt holes.

20170429_095913_zpsmh5ezc9m.jpg


20170429_102249_zpsyin8ipty.jpg


I added some decorative holes also.

20170429_112208_zpshok3zzt4.jpg


Fits perfectly, stainless fasteners used.

20170429_112348_zpskhwmebs5.jpg


Assembly is coming along but there are so many little details to handle that it is going pretty slow. It sits like this today.

20170430_130455_zpsblxbxjxx.jpg


20170430_130512_zps1eqnfatf.jpg


20170430_130530_zps1ddtecgh.jpg
 
Back
Top