- Joined
- Dec 27, 2014
- Messages
- 658
This is a companion thread to my Moving a Half Ton Mill
http://www.hobby-machinist.com/threads/safely-move-a-half-ton-mill.39908/
I decided to start a second thread because this thread will also have a lot of images, and I was not able to edit the title of the other thread.
In my other thread I give details about safety, tools, ramps, types of rigging, and some other stuff. I will not repeat all of that here, instead I will focus on the particular needs of moving a lathe.
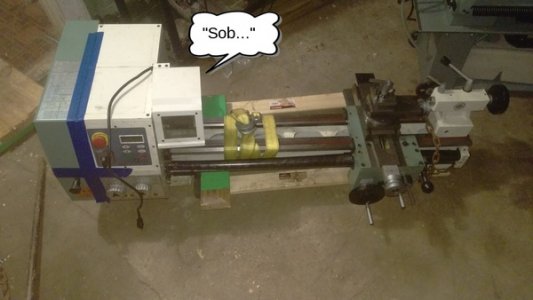
Lathes are both more difficult, and more dangerous to move, and there are particular details that must be paid attention to. When something goes wrong, it will happen very fast. One moment the lathe will be on the hoist, and the next moment it will be on the floor. In terms of applied force, the bed acts as a lever. What seems like a few pounds of weight at the tail stock is actually applying much more leverage against the hoisting point. When something at the tail stock moves and stops, it's force and momentum are multiplied many times.
There are two points in particular that absolutely must be done properly:
1) Lock the carriage! I really can't over emphasize how important this is. It can take surprisingly little tilt of the bed to have the carriage run merrily downhill into the tail stock, and have the whole lathe up end. If this happens you will realize you have a problem at about the same time the lathe hits the floor.
2) Rig so the lathe can not slide or rotate in the sling! There are 3 things that you must guard against here: the sling sliding along the bed, the lathe rotating in the sling, and the crane's hook sliding in the sling. Friction alone from wrapping the sling is not enough. The slings must pass through the casting and/or be blocked to prevent sliding. If the sling comes up from the beds in an inverted V-shape, the v should be knotted to make a loop so the hook is not able to travel along the sling. It is best to either have the sling pass up between the ways, or to use two slings/chains anchored to 4 points. If the later method is used the slings should be knotted, or the chains bolted into loops near the hook.
Other important details in no particular order:
Do not hoist using a sling on the spindle. This is especially important on a new lathe, applying a lot of side pressure on a new bearing that is not run-in can do permanent damage.
Do not wrap the slings so the apply force to the lead/feed screws. You can easily bend them.
Check and double check the hoist to make sure the boom is aligned down the center of the legs. Crane booms do get knocked out of center, I had to adjust mine before I proceeded.
Avoid rolling the hoist sideways. Engine hoists have a very bad habit of tipping over, the long bed on a lathe makes the crane even more likely to tip if the lathe is hanging transversely, or if the boom is off center.
Raise the lathe two or 3 inches and jounce it. This is the time to make sure the crane can deal with a lathe bouncing on the end of the boom.
Real Ohioans know that Ohio is almost West Virginia, and West Virginia is almost heaven...

The crate for my lathe was damaged, so I had to transport it on just the pallet. Note the tie-down going over the head stock is what is doing all the work. Vertical pressure is the key to keeping stuff put. There should be a second tie-down at the tail stock end as well, but the lathe is not tall enough at that end. Instead, two more tie-downs are used to hold the lathe at the 4 corners of the trailer. Important: these two tie-downs are NOT securing the lathe, they are there to prevent the tail stock end from swinging. Nylon stretches, anchoring the load at the corners is not a well secured load.
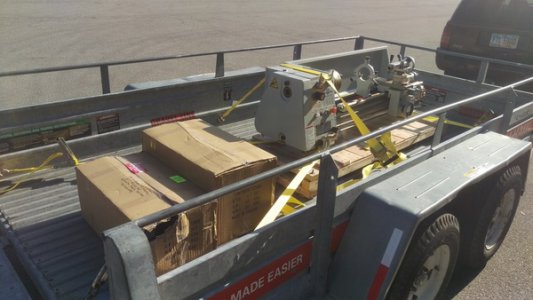
Note that my trailer is over-sized for the lathe. I intentionally did this because I wanted the head stock to come off the trailer first, and I needed to be able to get most bed in front of the axles with room for strapping. Planning this way both makes it easier for Matt to load the lathe, an easier for me to off-load it with the crane.
I used the same set up I used for the mill move. Anchors driven into the garage and basement floor with chains attached to the anchors. I use a chain fall and a come-along to do the shifting.
The lathe is drug to the back of the trailer using the come-along.
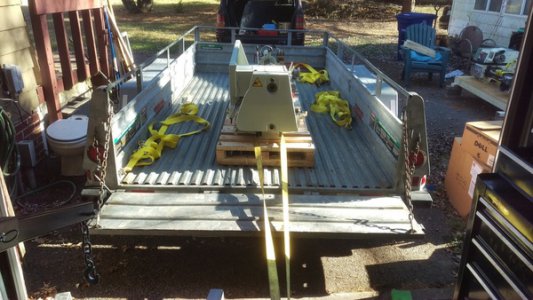
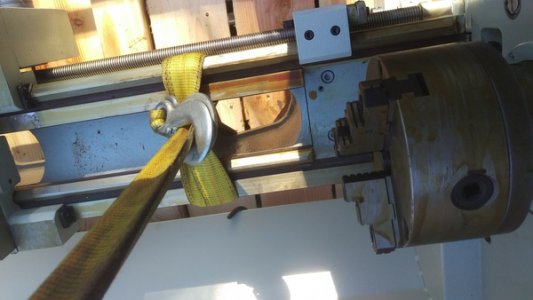
Note the sling comes up through the center of the casting, and that it is passing up through the front area of the hole. The underside of the bedway slopes up to the this point. The sling is not able to move toward the head stock because of the slope, and the web prevents it from sliding toward the tail stock. Rigging the lathe this way makes the lathe slightly back heavy - it wants to roll to the back.
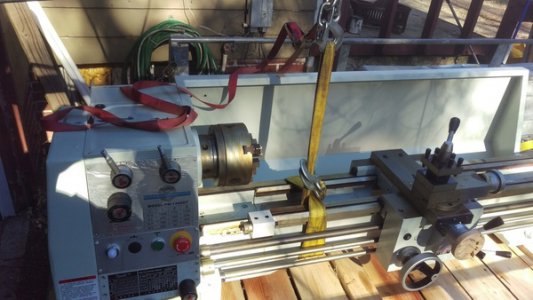
A smaller 1" tied down is run over the splash gaurd to prevent the lathe from rolling
I removed the tail stock and moved the carriage until the lathe was perfectly balanced
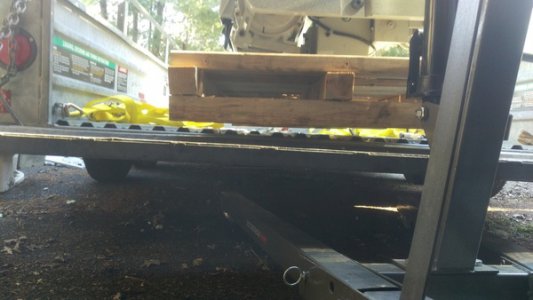
Once the lathe is perfectly balanced, I used two more 1" tie-downs attached to the pallet and front and back to prevent the lathe from tipping. These tie-downs are just barely tight enough to take up a bit of stretch, it is really important that they do not carry any actual load. The goal here is to prevent the lathe from rocking, something this long and heavy will build a lot of momentum very quickly.
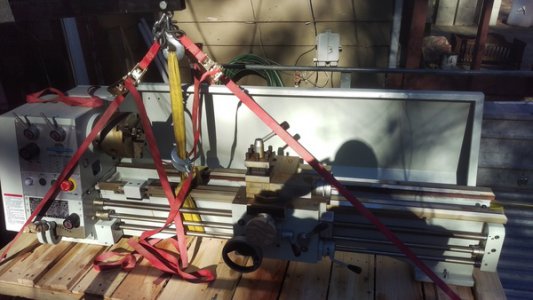
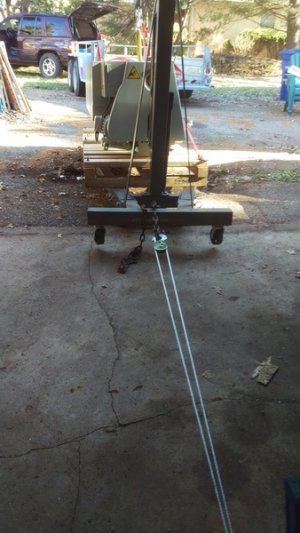
My driveway is very rough, and I was not able to fit the trailer into my garage. I used the come-along to drag the hoist and lathe back into the garage. I am working alone at this point, my son got held up getting back into town. Note the pallet is resting on the crane arms, but the boom is still under tension.
See my other thread for details on reinforcing the steps and the ramps.
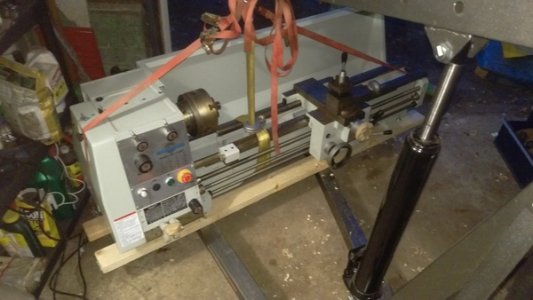
The lathe was removed from the pallet and bolted onto 2x4 skis. The skis are long enough so that if the worst happens, the skis will hit the floor of the basement first and hopefully protect the lathe.
The tail stock end was set on the ramp just inside the door, and the head stock end was block up. We then dismantled the crane and passed it down into the basement.
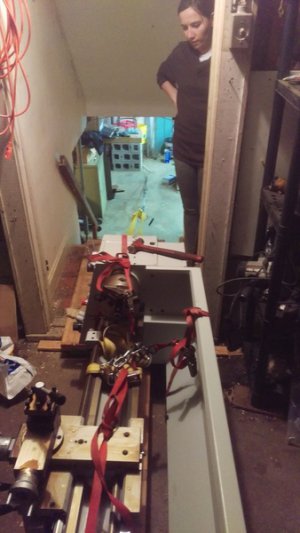
(My son's girl friend was co-opted to run the come-along.)
Note the chain and hook from the crane are still attached to the lathe. I did not want to go to the trouble of getting all the slings set up a second time, so I just unbolted the lifting chain from the crane.
Some picks of the slide down...
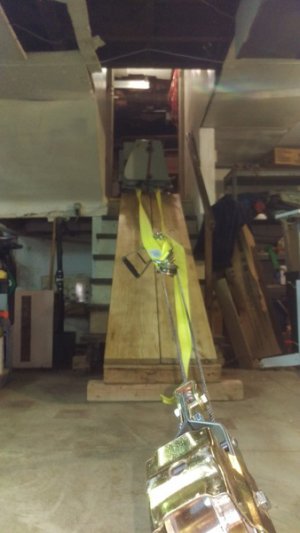
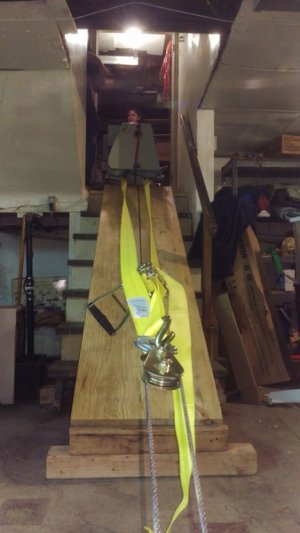
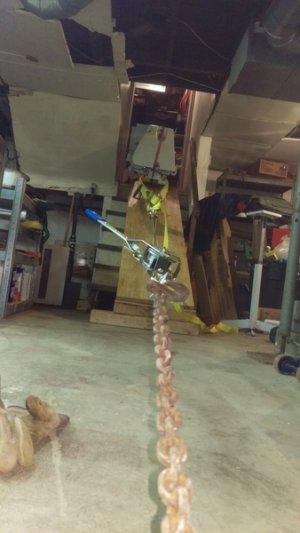
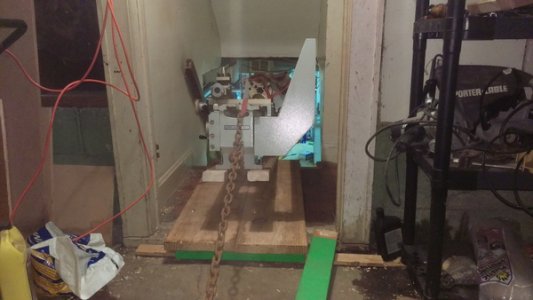
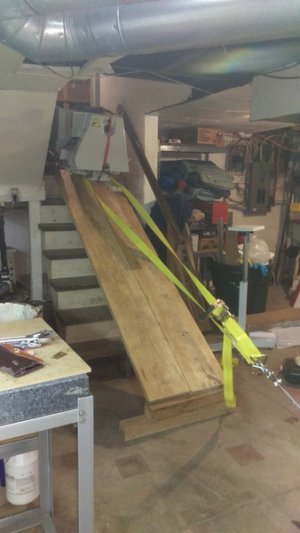
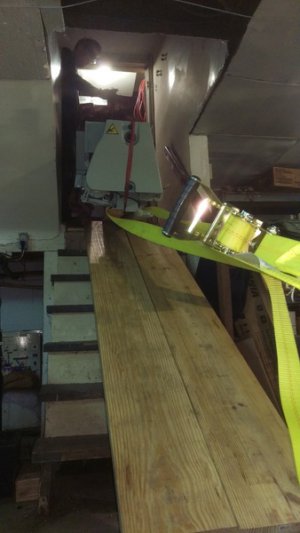
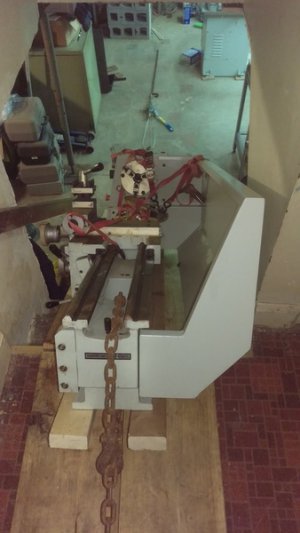
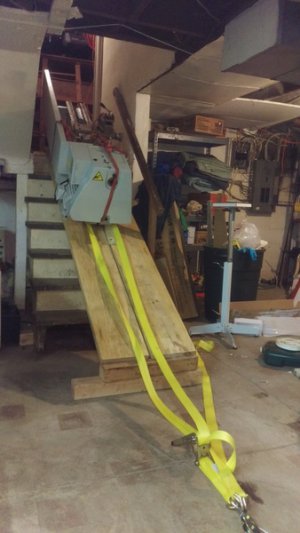
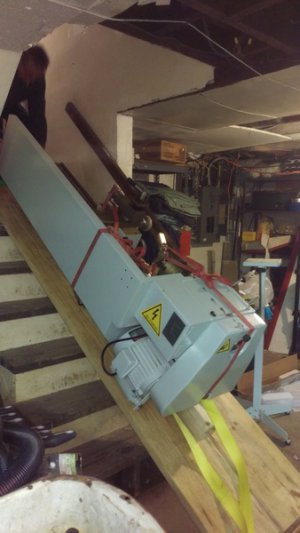
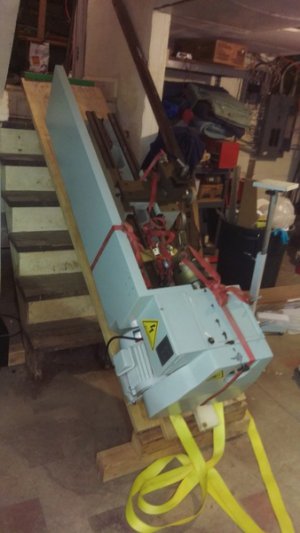
The pics are worth studying closely for small details.
A few notes in the pics:
Notice that once the lathe goes over the edge, there is no one in it's path. It would probably slide half way across the basement if the anchors failed.
I only own two slings, and the other one is on my old lathe. So we used a tie-down to drag the lathe on the ramps. Tie-downs should not be used for hoisting or lowering. It was okay in this case, but I used chains for lowering.
The lathe is under tension at the top and the bottom until it is fully tipped over the edge. If there is no tension pulling it from the bottom, the lathe will tip up a whole lot, then suddenly slip down a few inches. By tensioning from the bottom, we could control the angle of the lathe as it went over the edge.
Note the way the chain is wrapped around the casting at the tail stock end. Done this way, there is no danger of the chain levering the skis off, and it will not mar the machined surface of the bed.
Note the green 2x4 in the last pick at the top of the ramp, this is to keep the chain from catching on the ramp and possibly pulling the ramp down.
The bottom of the ramp is blocked up on a pair of 4x4's to make sure the skis do not hit the floor until the lathe is at the bottom of the ramp.
Like the mill move, we did not lower the lathe all the way to the floor. It is easier to pick the lathe off the ramp with the crane while the head stock is still higher than the legs on the crane.
Sorry, no more pics of the move. My son didn't make it til really late and it was around midnight at this point. I would have postponed the move, but I needed to get my old lathe back in the garage before any weather arrived.
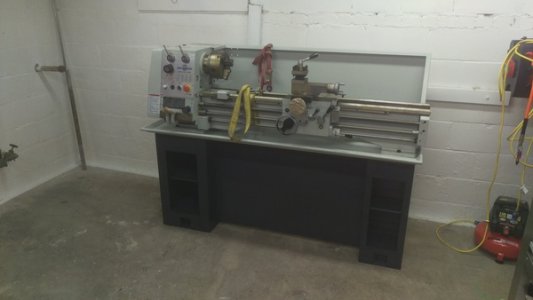
My new lathe in it's new home
Post any comments, corrections, or suggestions. I will respond as best I can.
-Josh
http://www.hobby-machinist.com/threads/safely-move-a-half-ton-mill.39908/
I decided to start a second thread because this thread will also have a lot of images, and I was not able to edit the title of the other thread.
In my other thread I give details about safety, tools, ramps, types of rigging, and some other stuff. I will not repeat all of that here, instead I will focus on the particular needs of moving a lathe.


Lathes are both more difficult, and more dangerous to move, and there are particular details that must be paid attention to. When something goes wrong, it will happen very fast. One moment the lathe will be on the hoist, and the next moment it will be on the floor. In terms of applied force, the bed acts as a lever. What seems like a few pounds of weight at the tail stock is actually applying much more leverage against the hoisting point. When something at the tail stock moves and stops, it's force and momentum are multiplied many times.
There are two points in particular that absolutely must be done properly:
1) Lock the carriage! I really can't over emphasize how important this is. It can take surprisingly little tilt of the bed to have the carriage run merrily downhill into the tail stock, and have the whole lathe up end. If this happens you will realize you have a problem at about the same time the lathe hits the floor.
2) Rig so the lathe can not slide or rotate in the sling! There are 3 things that you must guard against here: the sling sliding along the bed, the lathe rotating in the sling, and the crane's hook sliding in the sling. Friction alone from wrapping the sling is not enough. The slings must pass through the casting and/or be blocked to prevent sliding. If the sling comes up from the beds in an inverted V-shape, the v should be knotted to make a loop so the hook is not able to travel along the sling. It is best to either have the sling pass up between the ways, or to use two slings/chains anchored to 4 points. If the later method is used the slings should be knotted, or the chains bolted into loops near the hook.
Other important details in no particular order:
Do not hoist using a sling on the spindle. This is especially important on a new lathe, applying a lot of side pressure on a new bearing that is not run-in can do permanent damage.
Do not wrap the slings so the apply force to the lead/feed screws. You can easily bend them.
Check and double check the hoist to make sure the boom is aligned down the center of the legs. Crane booms do get knocked out of center, I had to adjust mine before I proceeded.
Avoid rolling the hoist sideways. Engine hoists have a very bad habit of tipping over, the long bed on a lathe makes the crane even more likely to tip if the lathe is hanging transversely, or if the boom is off center.
Raise the lathe two or 3 inches and jounce it. This is the time to make sure the crane can deal with a lathe bouncing on the end of the boom.
Real Ohioans know that Ohio is almost West Virginia, and West Virginia is almost heaven...

The crate for my lathe was damaged, so I had to transport it on just the pallet. Note the tie-down going over the head stock is what is doing all the work. Vertical pressure is the key to keeping stuff put. There should be a second tie-down at the tail stock end as well, but the lathe is not tall enough at that end. Instead, two more tie-downs are used to hold the lathe at the 4 corners of the trailer. Important: these two tie-downs are NOT securing the lathe, they are there to prevent the tail stock end from swinging. Nylon stretches, anchoring the load at the corners is not a well secured load.

Note that my trailer is over-sized for the lathe. I intentionally did this because I wanted the head stock to come off the trailer first, and I needed to be able to get most bed in front of the axles with room for strapping. Planning this way both makes it easier for Matt to load the lathe, an easier for me to off-load it with the crane.
I used the same set up I used for the mill move. Anchors driven into the garage and basement floor with chains attached to the anchors. I use a chain fall and a come-along to do the shifting.
The lathe is drug to the back of the trailer using the come-along.

Note the sling comes up through the center of the casting, and that it is passing up through the front area of the hole. The underside of the bedway slopes up to the this point. The sling is not able to move toward the head stock because of the slope, and the web prevents it from sliding toward the tail stock. Rigging the lathe this way makes the lathe slightly back heavy - it wants to roll to the back.

A smaller 1" tied down is run over the splash gaurd to prevent the lathe from rolling

I removed the tail stock and moved the carriage until the lathe was perfectly balanced

Once the lathe is perfectly balanced, I used two more 1" tie-downs attached to the pallet and front and back to prevent the lathe from tipping. These tie-downs are just barely tight enough to take up a bit of stretch, it is really important that they do not carry any actual load. The goal here is to prevent the lathe from rocking, something this long and heavy will build a lot of momentum very quickly.

My driveway is very rough, and I was not able to fit the trailer into my garage. I used the come-along to drag the hoist and lathe back into the garage. I am working alone at this point, my son got held up getting back into town. Note the pallet is resting on the crane arms, but the boom is still under tension.

See my other thread for details on reinforcing the steps and the ramps.
The lathe was removed from the pallet and bolted onto 2x4 skis. The skis are long enough so that if the worst happens, the skis will hit the floor of the basement first and hopefully protect the lathe.
The tail stock end was set on the ramp just inside the door, and the head stock end was block up. We then dismantled the crane and passed it down into the basement.


(My son's girl friend was co-opted to run the come-along.)
Note the chain and hook from the crane are still attached to the lathe. I did not want to go to the trouble of getting all the slings set up a second time, so I just unbolted the lifting chain from the crane.
Some picks of the slide down...


The pics are worth studying closely for small details.
A few notes in the pics:
Notice that once the lathe goes over the edge, there is no one in it's path. It would probably slide half way across the basement if the anchors failed.
I only own two slings, and the other one is on my old lathe. So we used a tie-down to drag the lathe on the ramps. Tie-downs should not be used for hoisting or lowering. It was okay in this case, but I used chains for lowering.
The lathe is under tension at the top and the bottom until it is fully tipped over the edge. If there is no tension pulling it from the bottom, the lathe will tip up a whole lot, then suddenly slip down a few inches. By tensioning from the bottom, we could control the angle of the lathe as it went over the edge.
Note the way the chain is wrapped around the casting at the tail stock end. Done this way, there is no danger of the chain levering the skis off, and it will not mar the machined surface of the bed.
Note the green 2x4 in the last pick at the top of the ramp, this is to keep the chain from catching on the ramp and possibly pulling the ramp down.
The bottom of the ramp is blocked up on a pair of 4x4's to make sure the skis do not hit the floor until the lathe is at the bottom of the ramp.
Like the mill move, we did not lower the lathe all the way to the floor. It is easier to pick the lathe off the ramp with the crane while the head stock is still higher than the legs on the crane.
Sorry, no more pics of the move. My son didn't make it til really late and it was around midnight at this point. I would have postponed the move, but I needed to get my old lathe back in the garage before any weather arrived.
My new lathe in it's new home

Post any comments, corrections, or suggestions. I will respond as best I can.
-Josh

