- Joined
- Feb 9, 2015
- Messages
- 99
About 4, or 5 weeks ago, I bought one of the Harbor Freight, 6" chop saws. In theory, it would be over kill for the two jobs, that I had in mind for it. I got a 5 3/8" Carbide tipped saw blade, that was made to cut soft metals, like the 5/8" Aluminum hex stock I needed to cut.
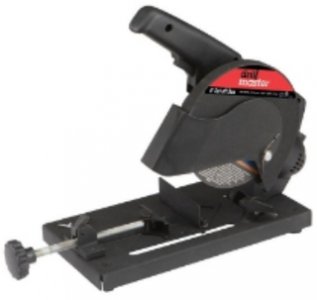
First thing I noticed, was that the vise jaws flexed and rose up, when tightened. Also, the motor and blade assembly would wiggle from side to side, on its pivot points. I made a few cuts anyway and found out that the blade was not 90 degrees vertical to the base. I could not return the saw to the store, because I had already drilled a hole in the side of the base, for an adjustable stop.
Ok, the option to return the saw was out. Let me take a look at those pivot bushings. They did not look so bad, but the holes in the base tabs for them to ride in, had a problem. One hole was higher up than the other. It caused the saw assembly to lean to one side.
First thought I had, was to just make new bushings and off-set the center hole in them to the maximum I could get. The cam action, would allow me adjust each side of the pivot shaft up, or down. The max adjustment was not quite enough. Chalk that one up to experience.
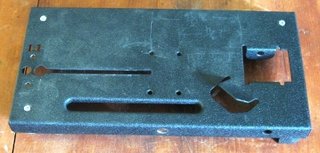
Ok, now it is time to make a whole new base, with my specs and solve all the problems, at the same time. This is what the original pressed sheet metal base looks like.
I looked around in my scrap iron pile and found a cast iron piece of the main frame from an old Acme reciprocating cut off saw, that I scrapped some years ago. (I had used the cast iron legs off it, to replace the sheet metal ones on my 1996 AMC 4x6 horizontal band saw).
This is what I came up with, after more. or less copying the basic cut-outs and holes, into the new base.
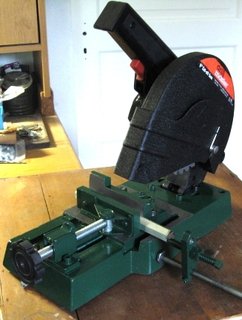
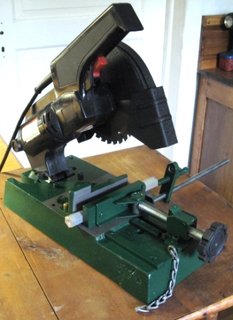
The stationary vise jaw is made from a right angle piece, that I cut off the base casting. The original thin jaw is fastened to it, in order to give me the scale , with the angle readings. The removable brass pin in the lower Rt. corner, sets the jaw back exactly 90 degrees to the blade.
The original front sliding jaw, just has a piece of 1/2" steel bar fastened to it, as you can see in the above photos. You can also see the 2 rails I added to make up for the step in the casting. They only come into play, when cutting a 45 degree angle, where the jaw has to be slid way back.
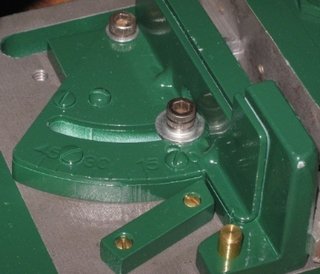
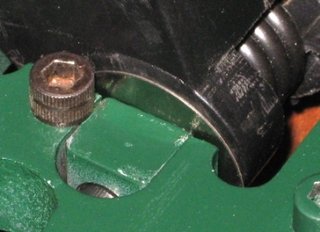
I made removable pillow type blocks, to hold 1/2" wide Brass pivot bushings, where the motor assemble hooks to the base. Here is a bottom view and one from the top. I also pinned the plastic housing, to the pivot axle. You can see where I shimmed the block on the left, with a .012 shim, to square the blade up to the base.
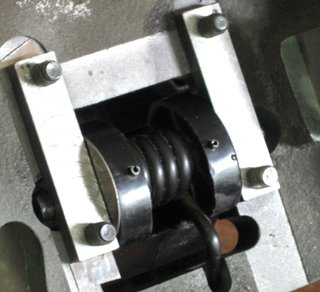
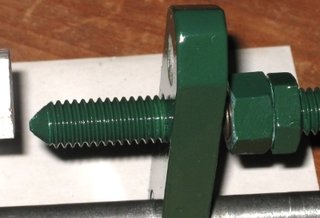
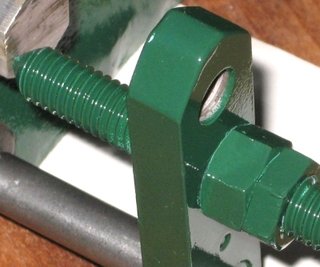
I made my adjustable stop, so that I can keep the screw finger tight for the part length. I can then back the screw out, prior to making a cut, so the part does not jam between the stop and blade. Then just turn the screw in against the jam nuts to set the length of the next piece.
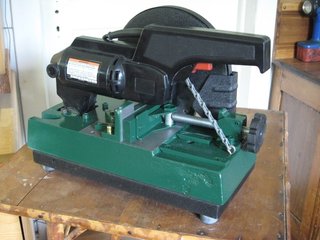
As there is no quick way to add rubber feet, to the new base, I figured, why not just bolt the old base to the new cast iron one. So I did. -----John

First thing I noticed, was that the vise jaws flexed and rose up, when tightened. Also, the motor and blade assembly would wiggle from side to side, on its pivot points. I made a few cuts anyway and found out that the blade was not 90 degrees vertical to the base. I could not return the saw to the store, because I had already drilled a hole in the side of the base, for an adjustable stop.
Ok, the option to return the saw was out. Let me take a look at those pivot bushings. They did not look so bad, but the holes in the base tabs for them to ride in, had a problem. One hole was higher up than the other. It caused the saw assembly to lean to one side.
First thought I had, was to just make new bushings and off-set the center hole in them to the maximum I could get. The cam action, would allow me adjust each side of the pivot shaft up, or down. The max adjustment was not quite enough. Chalk that one up to experience.
Ok, now it is time to make a whole new base, with my specs and solve all the problems, at the same time. This is what the original pressed sheet metal base looks like.

I looked around in my scrap iron pile and found a cast iron piece of the main frame from an old Acme reciprocating cut off saw, that I scrapped some years ago. (I had used the cast iron legs off it, to replace the sheet metal ones on my 1996 AMC 4x6 horizontal band saw).
This is what I came up with, after more. or less copying the basic cut-outs and holes, into the new base.


The stationary vise jaw is made from a right angle piece, that I cut off the base casting. The original thin jaw is fastened to it, in order to give me the scale , with the angle readings. The removable brass pin in the lower Rt. corner, sets the jaw back exactly 90 degrees to the blade.
The original front sliding jaw, just has a piece of 1/2" steel bar fastened to it, as you can see in the above photos. You can also see the 2 rails I added to make up for the step in the casting. They only come into play, when cutting a 45 degree angle, where the jaw has to be slid way back.

I made removable pillow type blocks, to hold 1/2" wide Brass pivot bushings, where the motor assemble hooks to the base. Here is a bottom view and one from the top. I also pinned the plastic housing, to the pivot axle. You can see where I shimmed the block on the left, with a .012 shim, to square the blade up to the base.


I made my adjustable stop, so that I can keep the screw finger tight for the part length. I can then back the screw out, prior to making a cut, so the part does not jam between the stop and blade. Then just turn the screw in against the jam nuts to set the length of the next piece.


As there is no quick way to add rubber feet, to the new base, I figured, why not just bolt the old base to the new cast iron one. So I did. -----John


